THE SEWING DIVAS sewing, design, fashion

November 22, 2009

Hot Patterns Free Slinky Shrug Download Simplified

Filed under: Mary Beth,Pattern Reviews,Patterns,Technology — Mary Beth @ 3:40 pm

Free Pattern HP's Slinky Shrug

The Slinky Shrug is available through yet another collaboration between Hot Patterns and the folks at Fabric.com.  The link to download the pattern is http://csi.fabric.com/shrug

This could be such a quick and easy gift done in elegant fabrics 🙂 and a wonderful bed jacket for reading in bed or shoulder warmer to wear while hand sewing in a chair by the window.  Imagine how pleasing that would be for your special person to receive.

Having cut my 21st century pattern using teeth on a pattern drafting software program I might have a trick that can make it easier for you to procure this free pattern.

I downloaded the PFD file and saved it to my computer.  Then I examined my printer’s settings carefully.  We want the printer to make no amendments to the pattern size or shape.  We’ll even sacrifice some of the cutting lines to make sure nothing changes.

First, let’s make sure the printer doesn’t distort your pattern.   Turn off the page scaling!  Don’t allow any setting like  fit to printable area!  Don’t have it shrink to printable area.  Make sure all other boxes that might affect the size of the printing are unchecked.

You can print out all the 27 pages like I did

That’s 4 columns of 7 pages each, plus the cover page and 2 pages of instructions…

Or you can take the easy way out, benefit from my compulsiveness, and print only those pattern pieces you really need.

Because the page notations made by the pattern drawing software doesn’t match the page numbers that the printer will print I had to do lots of counting and recounting but I’ve printed everything out using the following commands and got all the pages needed to make up the 2 pattern pieces.  You can see my confused and confusing notations below, but please ignore them and focus instead on the shape of the pattern

The Front

and the Back.

To print the front “cover page” and instructions:   make 3 separate commands to your printer.  Have it print page 1, and then page 8, and then page 15.  Done and there is no need to tape these together although you can see I did tape the first 2 together…Sigh.

To print out the main pattern pieces (there are only two)

Back (cut 1 on fold) make 3 separate commands that your printer print pages 5 – 7, and then 13-14, and then 20-21. These pages will show you sizes 6 through 22.

You’ll need to print page 25 if you are cutting a size 26 and want the reassurance of having the line to cut on.  The cutting line for size 24 lies right on the edge of the page so it doesn’t even print out at all.

No worry, all you have to do is measure the incremental increase between the other sizes and add that much to find the cutting line for size 24 and size 26.

Butt the edges of the pages together and tape.

Front (cut two pieces) print pages 10-11,  and then 17-19, and then pages 22-25.  Tape them together and you are all done with the tedious paperwork.

Butt the edges of the pages together and tape.

Now you can cut out your main fashion fabric.

To make the ribbing cut straight pieces with the fabric stretch going the length (long wise) of the piece being cut.

Remember that the exact length may have to be adjusted to suit the “stretch” of your ribbing so cut long and stretch test!

Front ribbing piece.  Cut one piece on the fold:  11 3/4” wide x 22 3/4 for size 6, add 3/8″ for each size you go up from size 6.  So size 10 would be 23 1/2, etc

Back Hem Ribbing piece:  again 11.75″ wide, cut on on the fold.  The incremental on the back is 1/2 inch so size 6 is 8 5/8″,  size 10 is 9 5/8, etc

Cuffs pieces are 5 3/4″ wide, size 6 is 10 7/8, and sizes up by a 3/8ths increment.

—————————

All that said: I cut the pieces all extra long so I could adjust  for easing and stretching.

—————————

All seam allowances are 3/8″.  I used the serger to join the wool boucle pieces together at the shoulder seams and side seams.  It’s too easy to do it any other way.  Of course you can also cut a lining and bag the ribbing with just a little hand stitching to close it up.

And might you have trouble finding ribbing, you can also experiment with knitting some ribbing or even using a stretch fabric that coordinates with your fashion fabric.

I pretended I didn’t have my stash of rayon ribbing to use because so many of us do not (to your great relief, believe me!) and I looked around for a knit to use.

I found knit faux fur!

It has a stiffening finish on the knit side that can be loosened by steam so I steamed and stretched to match the curves of the shrug:  stretched the cut edges around the neck area and stretched in the fold area around the bodice to the hips.  I also eased in the fur through the rounded front pieces:

I used the exact widths for the cuffs and edge ribbing so you can see the results.  I cut a size 14 throughout but adjusted the lengths of the faux fur since it does not stretch as much as ribbing would stretch.

Woven wool boucle with faux fur knit

Front of Shrug with Faux Fur for Ribbing

Outside our day has turned dark and rainy so I had to seriously alter these photos to show you any details at all

So wouldn’t this pattern make some great Holiday gifts?
June 27, 2009

Use Darts to Create Sheath Dress Drama

Making a sheath or shift dress like the one Georgene is doing now see the previous post can become a staple wardrobe piece. A sheath dress is a timeless design and if you have a good pattern it is a waste to not use it again and again.

But we woman want some more variations and making the same dress over and over is hardly an option we use without any design changes, except for some knit tops where we use a different fabric like prints or plain fabrics.

So if you have a good sheath dress pattern (vintage or new one) you can change the bust dart placement and have a new dress with the same good fit.

Playing with darts is a trick to use the same  pattern again. 

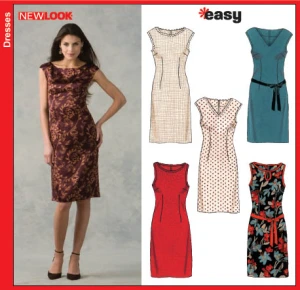
There are less sheath/shift dress patterns available these days but I found an example New Look 6643 which I used as an example to show you how to replace the bust dart into a new design feature.

New Look 6643 patternNew Look 6643

I do not have this pattern but I think it mimics my self drafted example with a side bust dart and waist darts.

I made a black sheath dress in a silk cotton fabric about 10 years ago but I have no picture of the finished dress to show you. See an example of the dress I made with a diagonal bust dart.

 I drafted a pattern to show you what to do if you have a sheath dress with a side bust dart and waist dart and want a new placement for the darts like this one,

new dart

My pattern draft example has no seam allowances added so if you want to change your pattern remove the seam allowances first, you can add them on later.

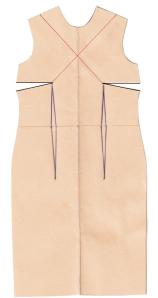
Step 1: Start with tracing your 1/2 front pattern on a double piece of paper since this new dress can not be cut on the fabric fold. 

Step 2 : make the pattern as a one piece and mark the center front line .

Step 3: draw a diagonal line from the shoulder towards the bust point, I measured 2 inches (5 cm) from the end of the shoulder, draw another diagonal line from the other shoulder crossing the line at center front.

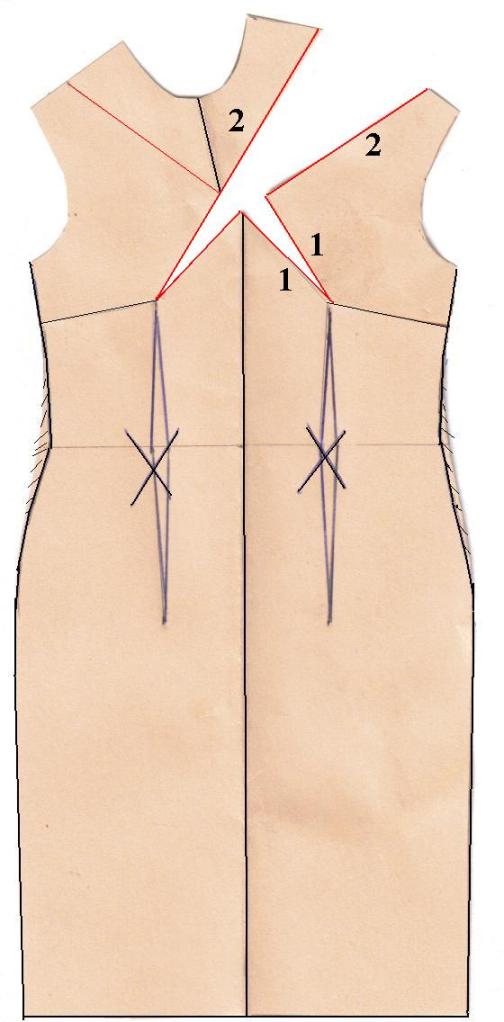
Step 4 : Cut  the right side new diagonal line open towards the bust point and fold the original side bust darts closed. Voila a new bust dart placement.

 Step 1                        Step 2                         Step 3                                 Step 4 

sheath dress 1  sheath dress 2sheath dress 3 xsheath dress 4 x

 Step 5: Since the bust side darts are now closed you can true the side seams in a smooth line , the waist darts do not get used in this dress so you can remove the wide of the waist darts from the waistline of the side seams from the original bust dart towards the hip line.

You can peg the side seams for a more slimming look, but please remember that your dress needs enough wide for a sanitary stop ( use of bathroom)

To sew the new dart start with sewing the bust dart maked with 1 and then sew the diagonal shoulder seam marked as 2

The best way to mark the new bust dart in your fabric is thread tracing.

I would suggest to use a  a plain fabric for this new bust dart design.

If you want to use a print or plaid fabric just remember that the upper right bodice is not on grain.

sheath dress 5  x

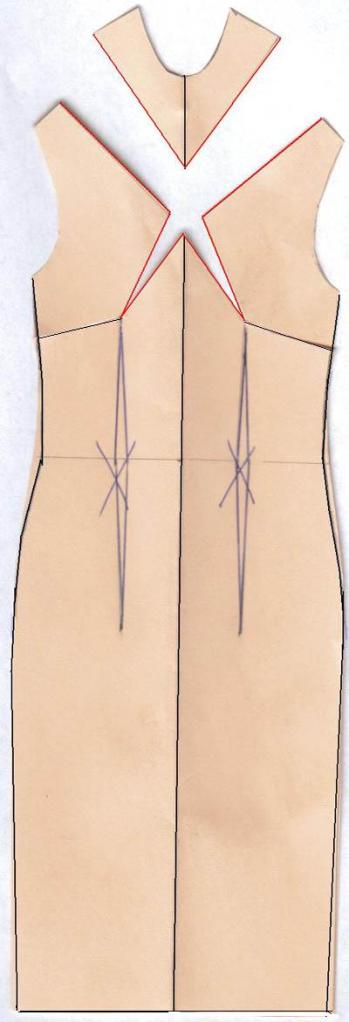
If you want to make this pattern in a print or stripe fabric I would suggest cutting off the upper bodice by cutting the left shoulder line towards the bust and voila another pattern design.

Using a stripe fabric and placing the upper part at the bias or cross grain ( crosswise) will give your dress another view. The possibilities are endless, you also can cut the center front line from the upper bodice and put both sides at the bias which will result in a chevron if you use a stripe fabric.


sheath dress 6  x

Enjoy sewing a new sheath /shift dress design.

You can of course use this new bust dart placement for any blouse or top too.

April 30, 2009

Vionnet’s Legacy Lives On

The latest news from The Center for Pattern Design landed in my inbox recently. Located in beautiful St. Helena in northern California, the Center is a repository of all things related to pattern. Patterns and tools are available thru the website, and older sewing and pattern design texts are being republished thru the Center’s Antiquity Press.

Cutting Cloth, the newsletter from Sandra Ericson’s Center for Pattern Design, was chock full of interesting tidbits. Not only is there a CPD conference slated for October this year at the Art Institute in San Francisco, there is news of a Vionnet exhibition at the Musée des Arts Decoratifs in Paris, running until January 2010. The museum is the recipient of 750 of Madeleine Vionnet’s toiles and all her papers. Sandra says this show is the first time since 1939, when Vionnet’s house closed, that her work has been shown.
vionnet-at-work
Sandra has been studying the work of ground-breaking French couturier Madeleine Vionnet for years. Vionnet is considered the inventor of draping on the bias, and used a half scale dress mannequin to work out her ideas. She was one of the first early 20th century designers to set up a series of ateliers and industrialize her designs
sandra
This past January, Diva Emerita MaryBeth from The Stitchery and I were fortunate to be in Palm Springs at back-to-back Claire Shaeffer workshops. We did a 5 day workshop with Sandra Ericson on Vionnet style draping, followed by a Couture Tailoring Techniques in the style of Yves St. Laurent. The draping class was so much fun; Ms. Ericson packed a lot in to each day. In the mornings we were treated to a teaching presentation of Vionnet’s methods and work, then a daily ‘show and tell’ with garments as examples of the day’s topic. Each afternoon we worked on half size dolls (aka My Size Barbies pressed into service as mannequins) draping our own styles using Vionnet’s approaches.

draping

Chronicle Books’ oversize book Madeleine Vionnet, with diagrams and photos is the go-to reference on Vionnet today. For those who are interested in looking at the historical context of her work, there is a lot about her place in the Cubist movement in the book Cubism and Fashion, by Richard Martin, that came out at the time of the exhibit at the Metropolitan Museum of Art in NYC in 1999.

Vionnet lives on, with many of today’s designers taking pages out of her book, sometimes quite literally.

Now all I have to do is figure out how to get to Paris before January 2010.

January 17, 2009

Your Very Own John Galliano

Filed under: couture sewing,Designer,Designer Inspirations,Fashion,Patterns — phyllisc @ 9:06 am

If you follow this link, you can download this pattern for John Galliano’s Pirate Jacket from his 2001 collection.   The site also has a gallery of  examples that sewers have made (I really like this green one.)  The SHOWstudio site is also some great background on the jacket and its place in his collection. Natually I had to download a copy; I’ll never wear this (DD might) but this design is worth saving because the pattern PDF appears to be the actual oaktag cutting templates, and they are covered with hand written construction notes.

Be warned however; thepirate-jacketpriate-jacket-backre are 60 pattern pieces.  And only one size.

October 19, 2008

Spiderlily Patterns 12808: Bib & Bow top

Filed under: Designer Inspirations,Fabric,Inspirations,Patterns,sewing — phyllisc @ 6:41 pm

 About a week ago I turned out a prototype of this top.  It was okay, but it needed more design and embellishment work.  My original inspiration was a post Gigi did a while back on the fabulous Blumarine top on the right.  The coolest thing about this design is that it’s made from two very similar, yet different, fabrics.  Compare the sleeve fabric and the bodice fabric; they are not quite the same.  I just love that idea, and adapted it here; both fabrics are a white, black and grey floral but one has a crinkly texture with Jacobean carnations, vines and thistles while the second is a smooth knit  with more naturalistic lilies and dogwood blossoms.  The smooth knit also has large areas of black, so I used one of those motifs for the bib.  The first version had no binding, and this posed a problem because the differences between the two fabric were blurred.  The smooth knit is also a natural white and the crinkle knit is bright white so I had to minimize that difference. Black binding solved the problem.

 Ann has a stunning lightweight matte jersey on Gorgeous Fabrics that she recommends as a binding; that’s what I’ve used here and it was definitelythe right choice (yes she is a close friend but trust me this is one terrific black knit. Actually – all three fabrics are from her.)  The black binding has a beautiful crepey RTW texture that is superior to the common-as-dirt black leotard knits you see at Jo-Ann’s.  It’s also very heavy and drapey like slinky, and it was what this top needed to separate the different patterns. 

DD didn’t like the bow front version, and wasn’t crazy for buttons, but when I suggested grommets instead that appealed to her edgey taste.  Gigi again has done an excellent tutorial on using grommets.

I made a few slight design and construction changes:


  • The center front contrast piece below the bib was removed because there was a lot happening with the fabrics to begin with and a contrast piece didn’t add anything.
  • 3 inches were added to the length at DD’s request – she likes her tops long
  • The trickiest part of this pattern is attaching the bib and the bib binding because there are four layers of fabric to contend with.  So after the binding was made I machine tacked it to the bodice in four places, and then pinned the bib and ran the whole thing through the serger. That worked well and nothing slipped out of place.

Amy of Spiderlily Patternsdid a great job drafting this pattern; it went together beautifully.  The pattern envelope shows three variations, but I think there are several more in there just waiting to bring out your inner fashion designer.  A long sleeve version would be adorable too; I may make that for myself.

Now back to that Rucci dress…

Next Page »

Create a free website or blog at WordPress.com.