THE SEWING DIVAS sewing, design, fashion

August 10, 2009

Pyramid dress from center for pattern design

The Pyramid dress pattern I ordered from center for pattern design because I was intrigued by the designs from the UK designer Julian Roberts.You can see him at work by watching 2 videos.

Pyramid dress a

The pattern is made by Sandra Ericson and based upon the principles of Julian Roberts system of Subtraction Cutting.

I was interested to see  how this pattern was drafted and to see how this design looked like in real which I could not really judge by the pattern design picture.


The pattern is partly drafted ( bodice part) you only need to draw the skirt portion which is a large circle around the pattern depending on the length you prefer.

pattern sketch a

Because this pattern needs one XL piece of fabric I tried this pattern by making it at ½ scale for my dress model so I had no piecing to do. I measured the pattern and draw a 1/2-scale pattern from it.

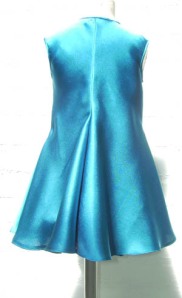
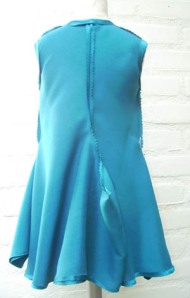
As you can see there are no seams in the skirt portion of the dress.It looks like a doughnut shape.


Pattern layout 1/2 scale size 12

Untitled-1 copy

The fabric I needed was 1.20 meter by 1.20 meter (1.312 x 1.312 yard) for my ½ scale pattern .So in other words if I would make this dress in a real size I need about 2.40 m by 2.40 m (2.624x 2.624 yard) that’s why you need to piece the fabric to get that wide.

 Suggested bias  fabrics: Loosely woven wools, silks or cotton; wool or silk crepe, crepe backed satin, silk velvet, georgette or chiffon.

I used stretch polyester satin for this unusual funky dress, and because it is only for showing on my scale dressmodel I did not finished the seams just use my pinking shear.

The instructions mention to sew stay tape at the shoulder seams to prevent stretching,I fused some pieces of fusible interfacing at  the sharp angles at the partly side seams, and finished the armholes and neckline with binding finished wide 2 mm wide (0.078 inch) from bias cut self-fabric.

I stitched the bias cut strip of fabric right sides together at armhole and neckline and pressed the  seams towards the bias cut piece, I folded the bias cut fabric around the seam allowance and hand stitched the piping in the ditch from the right side. Sewing it by hand gave me more control because of the small scale than using the sewing machine. Now there was no need to pin or baste first.

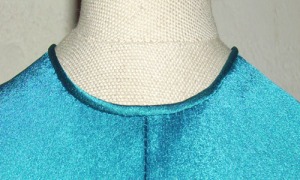
PICT0068detail piping

There was no need to leave an opening at center front because my ½ scale dress model has no head.But for a real size dress you need to leave an opening at the center back seam for 12,5 cm ( 5 inches)

 The hem is uneven after sewing the dress and due to the bias cut I left it un hemmed for a few days.But you also can leave it as irregulare level  but I choose for an even hem.

leftpyramide dress frontback

I marked the hemline with chalk using my lead measuring tape.

lead measurement tape

 The hem wide is very wide 5.88 meter (nearly 6 ½ yard) at ½ scale and I finished it by just turning in and stitched from the wrong side a few hairlines away from the fold.This way it looks neat on the dress model but for a real size dress it is not a good way because the raffles are still there.

       Inside view hem wide

hem wide insight view


Back view

back side a front side dress                                                                                    Front view

  If you want a unique funky dress this is the one that you should make.

The sewing is easy, the pattern is printed on sturdy paper and the instructions are clear there are even some variations like using the side flaps to use as  pockets.


PS. I am not planning to make this dress in my size, I only made it out of curiosity.

The cover dress picture has the folds at center front sewn differently, this is described in the pattern as variations on the theme.I folded the 4 corners flat at all the sides to achieve a more slimming view.

At the next pictures you can see the corners or cowls at the center, left, right and back of the dress.

inside side of the dress:

Front inside view  Back inside view

June 27, 2009

Use Darts to Create Sheath Dress Drama

Making a sheath or shift dress like the one Georgene is doing now see the previous post can become a staple wardrobe piece. A sheath dress is a timeless design and if you have a good pattern it is a waste to not use it again and again.

But we woman want some more variations and making the same dress over and over is hardly an option we use without any design changes, except for some knit tops where we use a different fabric like prints or plain fabrics.

So if you have a good sheath dress pattern (vintage or new one) you can change the bust dart placement and have a new dress with the same good fit.

Playing with darts is a trick to use the same  pattern again. 

There are less sheath/shift dress patterns available these days but I found an example New Look 6643 which I used as an example to show you how to replace the bust dart into a new design feature.

New Look 6643 patternNew Look 6643

I do not have this pattern but I think it mimics my self drafted example with a side bust dart and waist darts.

I made a black sheath dress in a silk cotton fabric about 10 years ago but I have no picture of the finished dress to show you. See an example of the dress I made with a diagonal bust dart.

 I drafted a pattern to show you what to do if you have a sheath dress with a side bust dart and waist dart and want a new placement for the darts like this one,

new dart

My pattern draft example has no seam allowances added so if you want to change your pattern remove the seam allowances first, you can add them on later.

Step 1: Start with tracing your 1/2 front pattern on a double piece of paper since this new dress can not be cut on the fabric fold. 

Step 2 : make the pattern as a one piece and mark the center front line .

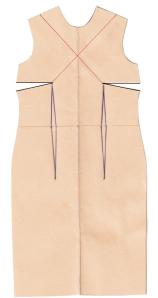
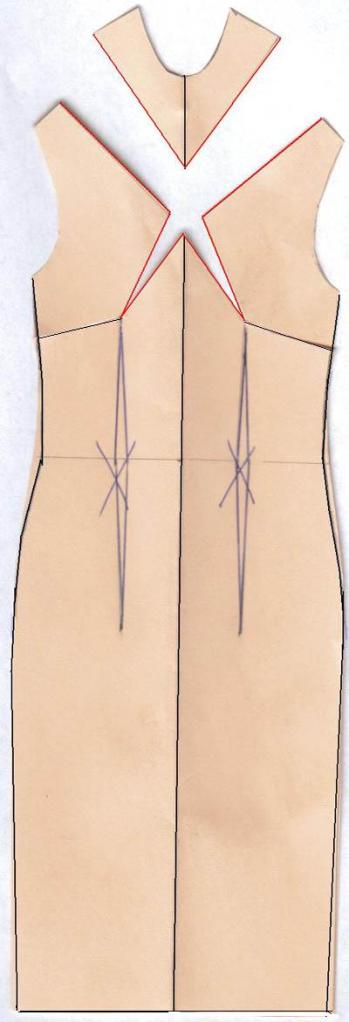
Step 3: draw a diagonal line from the shoulder towards the bust point, I measured 2 inches (5 cm) from the end of the shoulder, draw another diagonal line from the other shoulder crossing the line at center front.

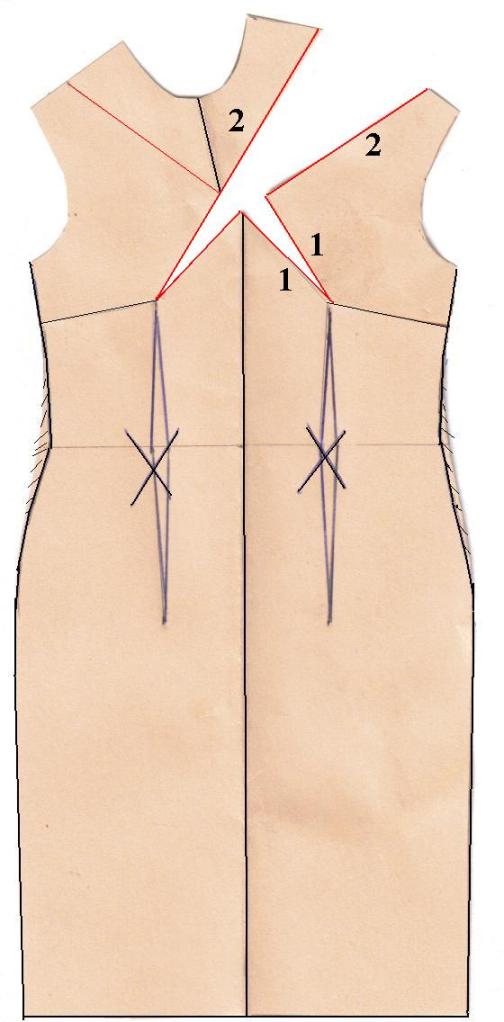
Step 4 : Cut  the right side new diagonal line open towards the bust point and fold the original side bust darts closed. Voila a new bust dart placement.

 Step 1                        Step 2                         Step 3                                 Step 4 

sheath dress 1  sheath dress 2sheath dress 3 xsheath dress 4 x

 Step 5: Since the bust side darts are now closed you can true the side seams in a smooth line , the waist darts do not get used in this dress so you can remove the wide of the waist darts from the waistline of the side seams from the original bust dart towards the hip line.

You can peg the side seams for a more slimming look, but please remember that your dress needs enough wide for a sanitary stop ( use of bathroom)

To sew the new dart start with sewing the bust dart maked with 1 and then sew the diagonal shoulder seam marked as 2

The best way to mark the new bust dart in your fabric is thread tracing.

I would suggest to use a  a plain fabric for this new bust dart design.

If you want to use a print or plaid fabric just remember that the upper right bodice is not on grain.

sheath dress 5  x

If you want to make this pattern in a print or stripe fabric I would suggest cutting off the upper bodice by cutting the left shoulder line towards the bust and voila another pattern design.

Using a stripe fabric and placing the upper part at the bias or cross grain ( crosswise) will give your dress another view. The possibilities are endless, you also can cut the center front line from the upper bodice and put both sides at the bias which will result in a chevron if you use a stripe fabric.


sheath dress 6  x

Enjoy sewing a new sheath /shift dress design.

You can of course use this new bust dart placement for any blouse or top too.

Create a free website or blog at WordPress.com.