One thing I love about this fabric is the beautiful floral border, which will run along the hem of the dress. A vertical side seam all the way to the hem would split the lovely pattern, and I wanted to preserve that as much as possible.
So I’m planning to combine two techniques; the “appliqué seam”, and a quilting technique known as “balloon appliqué”. If you have a copy of Couture Sewing Techniques by Claire Shaefffer, go to page 55 and look at the horse to the left on the Schiaparelli “Circus Jacket”. An appliqué seam combines a regular seam and hand appliqué when you want to preserve a shape across a seam.
Claire published an article in the May/June 2004 (#94) issue of Sew Beautiful where she illustrates how to do this technique. I’ve been keen to try it ever since, and this project was perfect except for one problem; this silk brocade ravels instantly and badly, no matter how carefully I handle it. There was no way I’d be able to turn under the edges of the appliqué without shredding the fabric.
After giving it some thought, and remembering that I’ll use a silk organza underlining, I recalled reading years ago about “balloon appliqué”. With this technique you layer a piece of tulle or silk organza on top of a motif and stitch around with tiny stitches – at least 12 per inch. Then carefully cut out the shape leaving a scant margin. Make a slit in the backing and turn the shape inside out – now you can place the shape anywhere you like. Stitching the appliqué is easy because the edges are already turned under.Here is how I combined both techniques:
This shows a thread traced piece of border fabric; the thread tracing is the seam line and extra fabric has been cut around a few motifs:

Layer and baste the silk organza backing fabric. The piece is then pinned vertically and the two layers are basted together:

Remove the pins and stitch only around the motifs:
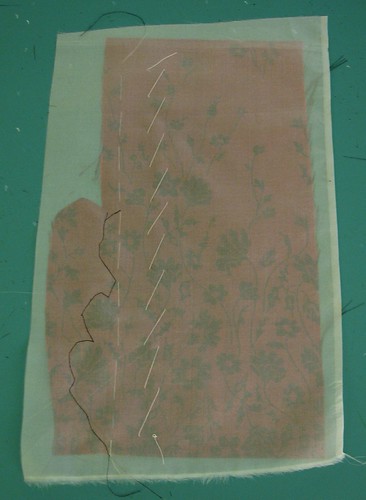
Trim the motifs up to the regular seam allowance

Turn the appliqué – you have just done the balloon appliqué technique. Now align the seam allowance and sew the seam, stopping at the turned out balloon appliqué. Note: There is also a piece of silk organza underlining on the matching pattern piece.

Flip the two pieces over and bring the appliqué to the right side.

 You’ll see that I will need to finish this raw edge; I’ll probably machine sew a length of rayon seam binding over the raw edge, and then hand fell stitch the edge to the silk organza. Likewise, the edges of the appliqué need to be hand fell stitched to the fashion fabric.
Notes to myself:
- I trimmed too close in a few spots and the fabric has come apart and raveled; I need to watch for that.
- The white edge you see is the silk organza; I suspect the black won’t be noticeable.
- If I see some funny breaks across motifs, I can individually balloon appliqué a full size of a motif on top of another of the same motif.
- On the real dress the front piece will have balloon appliqués seaming that wraps towards the back; I think that’s the most elegant way to use this seam from a design standpoint.
- My hand stitching will need to be strong and minute since there will be stress on this seam while I wear the dress.
- Even though I’ve mocked up the seaming technique; I still have planning to do. I’ll need to figure out the order of construction in advance so I can do the appliqué and hand stitching both inside and out while the dress is still in a partially constructed flat stage. Plus there is a center back invisible zipper to install as well.
Today is prep day for Thanksgiving at our house (15 people) and since I’m still waiting for materials to arrive I’ll have a few days think about the construction.


 Subscribe with Bloglines