THE SEWING DIVAS sewing, design, fashion

August 25, 2009

Lead weight hem

Filed under: Els,sewing,sewing notions,Tutorials — Els @ 7:05 pm
Tags: ,

Wearing a linen blouse in summer is very weather friendly if you can stand the wrinkles, which of course are a characteristic of wearing linen fabric.

I love to wear linen blouses but I do not like the wrinkles and pleats of the back hem. I wear a long blouse so it creases a lot at the back hem due to sitting.  I wondered if there was a cure to prevent any more bunching up the hem.

So after some brainstorming I came up with the idea to use a lead tape inside the hem, to keep the hem hang straight even after sitting.

Lead tape is mostly used in curtain hems but I did use the lead tape inside my blouse hem and it works like a charm.

I bought some lead tape the lightest weight the store had was 35 grams per meter , but that was a bit too heavy to use in a blouse hem. Unfortunately the store did not have the lightest weight tape which is 15 grams per meter. The 35 gram tape was not the right weight to use in my blouse hem, it was too heavy and it showed a ridge in my hem seam allowance, due to the larger diameter.

detailed view of the lead weight tape, partly uncovered to show the lead weights:
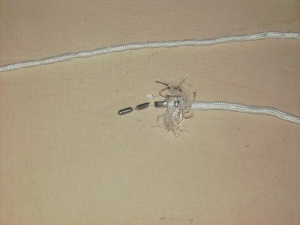
lead tape 35 grams per meter

Lead tape is available per meter here in The Netherlands in different weights and I needed a lightweight lead tape 15 gram per meter which is the lightest weight.

See the difference in size and diameter for 35 grams at the top and 15 grams at the bottom. I removed some of the cover so you can see a detailed view what is inside the tape.

lead tape difference

So I remembered that I had some polyester organza curtains in my stash , which were a big mistake, color was wrong, but I could re-use the lead tape. One hour later I had ripped the lightweight lead tape 15 grams per meter and used that tape to stabilize my linen blouse hem.

I wore my blouse for a day and the hem is still looking good and no bunching up hem.
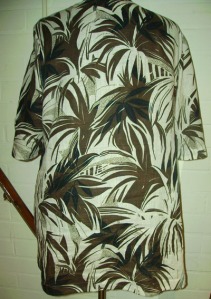
blouse back

blouse front

Eureka that was the best solution to keep my linen blouse hem stay put.

I secured the lead tape at the inside of the mitered corners of the blouse hem at center front and side slits with some hand stitching.

The tape is laying loose in the hem allowance and should withstand washing. I am going to hang dry my blouse so the covered lead tape will not harm my linen fabric.

I made  a sample for pressing/ ironing and noticed that if I move the tape a bit upward I can press the hem fold without showing a small ridge, due to the tape which is inside the hem allowance.

So there is no need to press the hem touching the tape because it can move due to the hem allowance ( 1,5 inch) I used for this blouse.

Since I had no information if this tape was available in the US I asked fellow diva MaryBeth and she directed me to a US source for this tape  amazon.

If you love to wear linen and want to prevent any bunching up of the hem, this is a way to keep the hem hanging straight.

August 20, 2009

Vogue 1132, Fall 2009

Filed under: Mary Beth,Pattern Drafting,Pattern Reviews — Mary Beth @ 4:02 pm

A tricky, tricky pattern….  Did it attract your attention when you first saw it?  I know many liked it:  so urbane and stylish in Vogue’s envelope photo with it’s bias cut wide A-line (not circle) skirt, nipped waist  and flounced peplum.

V1132

It is offered in size 8 (bust 31.5, waist 24, hip 33.5) to size 22 (bust 44, waist 37, hip 46).

Let me start by saying that this is the hardest post I’ve ever done since I started blogging in 2006.    I have taken days to work up my courage.   I have had a total Blogger’s Meltdown and been paralyzed with fear.

This is a test.  It is not a wearable muslin.  Please don’t tell me how to fix this thing.

Just take the facts from this humiliating and public display of raw, un-photoshopped photos and determine if this is really a style that would work for you. Warning:  some photos maybe too graphic for delicate sensibilities.  Viewer discretion is advised.

First:  the skirt is 36″ long from the waist and 98″ in circumference at the hem.  That’s a whole lot of skirt for a short person and even a whole lot of skirt for a tall person.  It might work for someone who is over 6 foot tall.  I am not.  I ran up a test of my test to try to get a good length, cutting off 10 inches so it would be long but not too long and decided on this proportion for me:

Test Skirt

OK, the length is not bad but look at how the skirt front dips down? That’s because the waist band needs to be tighter to hold the skirt level at the waist. So cut it smaller than you normally would.

Also oddly, there is only one pattern piece for the front and the back. A back piece should be wider than the front by an inch or so as most people are wider across the back.

I only had an RPL (rayon polyester lycra) in a comparably sized plaid and I had plenty of it with no real plans for a serious garment. It is a bit beefier than a woven wool suiting but not by much so it became my “muslin” fabric.

Here’s the skirt:

skirt back

The plaid on the bias widens the back view…need I say more? It demands a jacket.

Here’s the jacket:

full back

Hmmmm, maybe I can stand to see it from the front???

side front

Oh , no, not so good either…well maybe a quarter turn will do?

back

Enough with the plaid already!

Not even adding a wide belt would help.

Perhaps done in a more muted plaid like the dark grey shown on the envelope…naw.  I don’t think that this jacket and skirt would work well together on anyone shorter than 6 foot tall and really, it’s not a good look for anyone who is over a size 2.  Oh wait, it’s not offered in a size 2.

So, to get on with this exploration and to relieve our eyes I’ll try to discuss the jacket while in some brown slacks

Jback

that’s a bit of relief from the plaid but, HMMMMM,  that peplum sticking out there…

Side

It might lie flatter if made from a fabric with a looser weave but here’s the pattern pieces:

Peplum pieces

On top of the fact that there’s almost one and a half full circles of fabric over your behind, the jacket instructions and lining pattern piece have you line to the edge so there is an added line of stitching to stiffen those folds.

And the lining shows in the folds (you’re not warned, too bad I didn’t read the whole instruction sheet first!)

Peplum Lifted

Huh? You can’t see that in the photos on the envelope

100_1310

I even have toyed with the idea of tacking the back folds into place but

what about those sleeves? They look nice and tight in the photo, even the armscye is low enough so as to compensate for the tightness of the sleeve

Sleeve Taper

but the pattern piece does not taper as much as it should to produce such tight sleeves

Sleeve Pattern piece

Refer back up to my jacket photos. I have cut an 18 and taken out an extra inch of width tapering from the elbow dart down to the sleeve hem.

Hmmm.   Somehow, it just does not look like the same outfit.

So my dear readers (I hope after these shocking photos I can still call you friends) I am going to close this chapter now.  I have mustered up the courage to post this and, if I were a rational person, I’d go on a week long vacation or a major margarita bender, which ever comes easiest, but when it comes to sewing and art, I’m just not that rational.

No loss to me of the fabric and my time is not as precious as it once was.  I’ll be all right.

I hope I have saved at least one of  you some time, fabric and effort.

sewing hugs to all 🙂

August 18, 2009

Not Just For Plant Hangers

Filed under: Designer Inspirations,Embellishment,Georgene — georgene @ 6:06 am

chadomacrame
Macramé back for Chado Ralph Rucci by Gail Gondek

A note from The Center for Pattern Design landed in the inbox about the 2009 Pattern Design Conference in San Francisco Oct 2- 4. The goal is to bring together master pattern makers who will ‘share their insights, their designs, and the pattern techniques that make them a critical part of the fashion industry.’

The keynote speaker at the conference is Gail Gondek, pattern designer for Chado Ralph Rucci, Geoffrey Beene, Ralph Lauren, Marc Jacobs, and Peter Som. Her talk, Concept to Catwalk, ” will shed light on the often mysterious pattern design process that produces a fashion masterpiece at the highest levels. Her work has been shown at the Paris Couture and Pret-a-Porter shows and regularly at New York’s Fashion Week for the past 20 years.” Some of her pieces have been displayed at the Metropolitan Museum of Art, the Museum of Modern Art, the Museum at the Fashion Institute of Technology, the Fashion Museum at Kent State University, and the Museum of Contemporary Art, Los Angeles (MOCA).

The photos attached to the press release show some of Ms. Gondek’s marvelous work, including some startling macramé inserts. I was intrigued by some of the construction shots that were included in the press pack.

greyknotMA18005358-0053
Fitting the knots to the pattern

PeterSom-2520010MA18005365-0025
Placing macramé design on the dress form

This seemed particularly serendipitous, as my neighbor showed up wearing a wonderful knit tank top with a macramé back just 3 or 4 days ago.
tee back
Back

tee front
Front

Time to bust out those macramé skills that are long dormant, or ask your grandma to give you some pointers on technique? First make a ton of plump bias spaghetti cord out of your fabric, then experiment with some knotting. It’s great seeing this treatment at the very high end of haute couture, alongside the much more mainstream 2×2 rib knit top with the matching jersey knotted cord.

August 10, 2009

Pyramid dress from center for pattern design

The Pyramid dress pattern I ordered from center for pattern design because I was intrigued by the designs from the UK designer Julian Roberts.You can see him at work by watching 2 videos.

Pyramid dress a

The pattern is made by Sandra Ericson and based upon the principles of Julian Roberts system of Subtraction Cutting.

I was interested to see  how this pattern was drafted and to see how this design looked like in real which I could not really judge by the pattern design picture.


The pattern is partly drafted ( bodice part) you only need to draw the skirt portion which is a large circle around the pattern depending on the length you prefer.

pattern sketch a

Because this pattern needs one XL piece of fabric I tried this pattern by making it at ½ scale for my dress model so I had no piecing to do. I measured the pattern and draw a 1/2-scale pattern from it.

As you can see there are no seams in the skirt portion of the dress.It looks like a doughnut shape.


Pattern layout 1/2 scale size 12

Untitled-1 copy

The fabric I needed was 1.20 meter by 1.20 meter (1.312 x 1.312 yard) for my ½ scale pattern .So in other words if I would make this dress in a real size I need about 2.40 m by 2.40 m (2.624x 2.624 yard) that’s why you need to piece the fabric to get that wide.

 Suggested bias  fabrics: Loosely woven wools, silks or cotton; wool or silk crepe, crepe backed satin, silk velvet, georgette or chiffon.

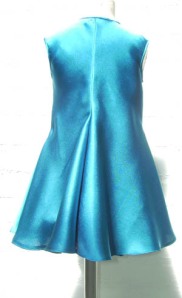
I used stretch polyester satin for this unusual funky dress, and because it is only for showing on my scale dressmodel I did not finished the seams just use my pinking shear.

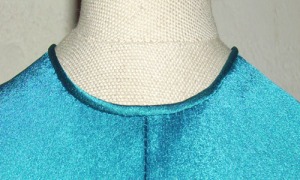
The instructions mention to sew stay tape at the shoulder seams to prevent stretching,I fused some pieces of fusible interfacing at  the sharp angles at the partly side seams, and finished the armholes and neckline with binding finished wide 2 mm wide (0.078 inch) from bias cut self-fabric.

I stitched the bias cut strip of fabric right sides together at armhole and neckline and pressed the  seams towards the bias cut piece, I folded the bias cut fabric around the seam allowance and hand stitched the piping in the ditch from the right side. Sewing it by hand gave me more control because of the small scale than using the sewing machine. Now there was no need to pin or baste first.

PICT0068detail piping

There was no need to leave an opening at center front because my ½ scale dress model has no head.But for a real size dress you need to leave an opening at the center back seam for 12,5 cm ( 5 inches)

 The hem is uneven after sewing the dress and due to the bias cut I left it un hemmed for a few days.But you also can leave it as irregulare level  but I choose for an even hem.

leftpyramide dress frontback

I marked the hemline with chalk using my lead measuring tape.

lead measurement tape

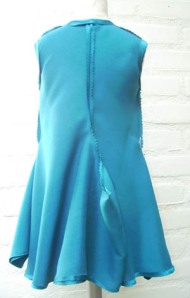
 The hem wide is very wide 5.88 meter (nearly 6 ½ yard) at ½ scale and I finished it by just turning in and stitched from the wrong side a few hairlines away from the fold.This way it looks neat on the dress model but for a real size dress it is not a good way because the raffles are still there.

       Inside view hem wide

hem wide insight view


Back view

back side a front side dress                                                                                    Front view

  If you want a unique funky dress this is the one that you should make.

The sewing is easy, the pattern is printed on sturdy paper and the instructions are clear there are even some variations like using the side flaps to use as  pockets.


PS. I am not planning to make this dress in my size, I only made it out of curiosity.

The cover dress picture has the folds at center front sewn differently, this is described in the pattern as variations on the theme.I folded the 4 corners flat at all the sides to achieve a more slimming view.

At the next pictures you can see the corners or cowls at the center, left, right and back of the dress.

inside side of the dress:

Front inside view  Back inside view

August 7, 2009

Sewn Jewelry

Filed under: Accessories,Designer Inspirations,Embellishment,Georgene — georgene @ 1:35 am

L pearl grosgrain tassle necklace

l necklace detail Several high profile designers have some interesting jewelry in their collections right now. Both Albert Elbaz at Lanvin, and Oscar de la Renta have some statement pieces that rely on needle and thread as much as chains, pearls, and beads.
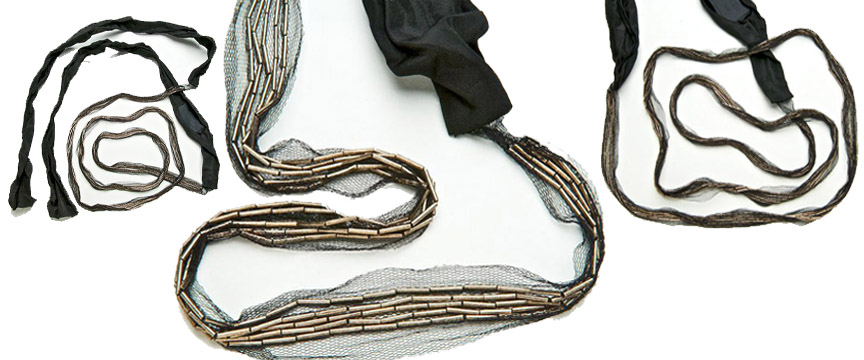
bead and tulle necklace
Here are some of my favorite pieces in this category of sewn jewelry.

O pearl chain necklace copy

I have recently discovered The Ribbonerie in San Francisco’s Laurel Heights. Oh my, there are ribbons and laces, antique and modern, beyond description. So no excuses! since there is no problem getting access to beads and different chains…
ribbonerie

Let us know if you have seen any other examples of sewn jewelry online. It’s a fascinating category.

tulle pearl necklace

Next Page »

Blog at WordPress.com.