THE SEWING DIVAS sewing, design, fashion

November 26, 2006

Patternmaking Calculator

Filed under: Pattern Drafting,Tools — georgene @ 12:08 am

By Diva Georgene 

I ran across this handy pattern calculator at Pattern Stringcodes.com. Click on “software” at the end of the french curve banner at the top, and you will find a free software download for a calculator that works in inches and metric and can calculate in decimals as well as fractions. No more wondering how many centimeters 3/8 of a yard is!
I also love the feature that allows you to calcualte the radius of circle skirts – full and partial.
A handy item indeed, and now it sits on my desktop as a little icon.
I note also that Pattern Stringcodes sells basic and custom slopers. It seems like it could be a great service for those who are in the market for this, however based on a review of their sloper at Kathleen Fasanella’s Fashion Incubator blog, I would not be so quick to recommend it!. However, read up on their info on what slopers are good for – a great education on this basic building block for patternmaking.

November 21, 2006

Bobby Breslau bag


 By Diva Els
Bobby Breslau  bag

I wanted to make a copy of this unusual shaped bag after reading about this bag at
Kathleen Fasanella’s website And reading more about the bag that Gigi is making
I had hopes to find the pattern but no luck . Gigi was kind enough to lend me the pattern .
 
Bobbb Breslau pattern
Items I used for this bag:
The leather bag is sewn with a home machine Pfaff 1467, I used a regular sewing foot on which I glued a piece of Teflon under the foot. Stitch length 3.5, needle size 90 and regular Gütermann thread. Leather glue, small piece of lining leather and a hammer to pound the seams flat. I had a large piece of leather about 32 square foot in my stash and it was enough for making this huge bag, although I had to cut the front pocket with a center seam. Fusible hair canvas for leather in two different weights and a soft non woven fusible special for leather.
haircanvas
facing flap interfacing
I also used fusible woven tape for leather at the front opening and the inside pockets for stabilising, as well as 2 pieces of rigilene boning (6 and 12 mm)
Rigilene boning
Detail rigilene boning,
Detail rigilene
The wider one 12 mm which I stitched at the inside of the flap at the spot where the back parts ends and the flap starts.
rigilene flap
The other piece of rigilene boning (6 mm ) I glued between the facing and the upper part of the front and topstitched from the right side of the bag.
rigilene front
The most heavy haircanvas is fused at the back, side parts and the shoulder straps ( without seam allowances), the other pattern parts are interfaced with the lighter weight canvas while the nonwoven interfacing is fused at the flap facing, the inside pocket, and the shoulder strap facing part.
The pockets are lined except the cell phone pocket. To further strenghten the straps I decided to use a bit more interfacing so I fused a second layer of the heavy hair canvas to these.
The magnetic closure at the front is stabilized with a piece of leather lining at the inside and I also glued a piece of the leather lining on top of it so the metal part is covered and can not damage the leather.
Front pocket
pocket magnetic closure
I added a cell phone pocket and a key ring at the side part.
The straps were cut longer and were not tied in a knot (in contrast to the Pattern example), but they were sewed together as one. I like the longer shoulder strap so I can wear the bag crossed over the shoulder.
I added a Vogue American Designer Original label inside the back pocket,
Label
The unusual shape of the bag bottom,
bottom
The sizes of the bag I made are:
width 16 inch ( 41 cm)
depth side 9,5 inch ( 24 cm)
height 12 inch ( 30 cm
Shoulder strap length 53 inch ( 134 cm)
PS
Pam from http://sewexciting.blogspot.com/ sells  Pro_Tricot fusible interfacing,  which you can use on leather since it is fused using low heat. 


November 18, 2006

Stalking the Ghost of Coco Chanel – Part II

Filed under: Couture Techniques,Designer Inspirations,Fashion — phyllisc @ 10:00 am

by Diva Phyllis

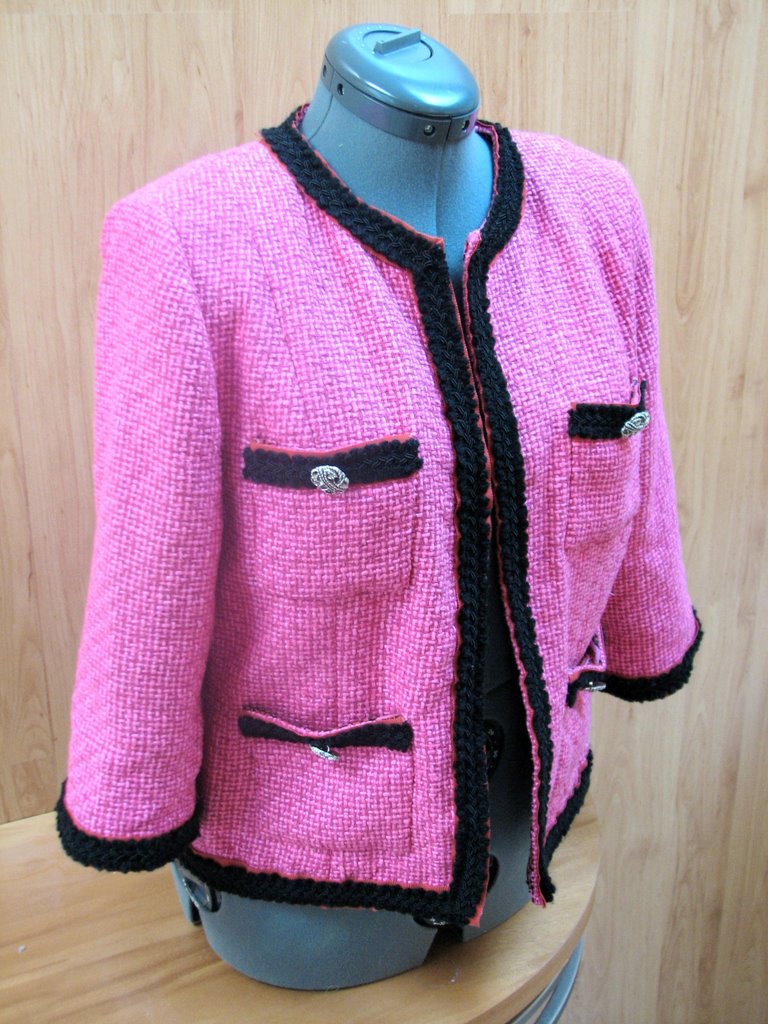
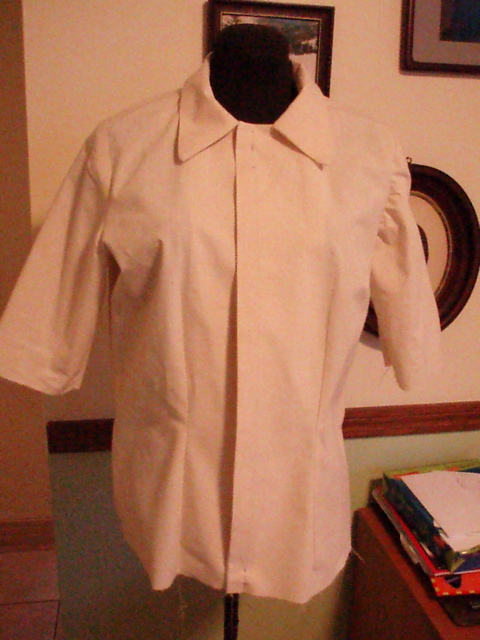
Boy, it feels good to finish a UFO! Divas Ann and Georgene should recognize this jacket – I started it around the time the three of us went to the Chanel exhibit at the Met in the spring of 2005.

In my Chanel technique research, several authors mention the “poverty de luxe” and the “luxe cache” of Chanel haute couture – basically, the hidden luxury. I had no clue what that meant until I wore this jacket for the first time yesterday. It has a soft sweater like quality, and it’s sooo comfortable! In fact, I don’t store on a hanger – it’s folded up with my sweaters.

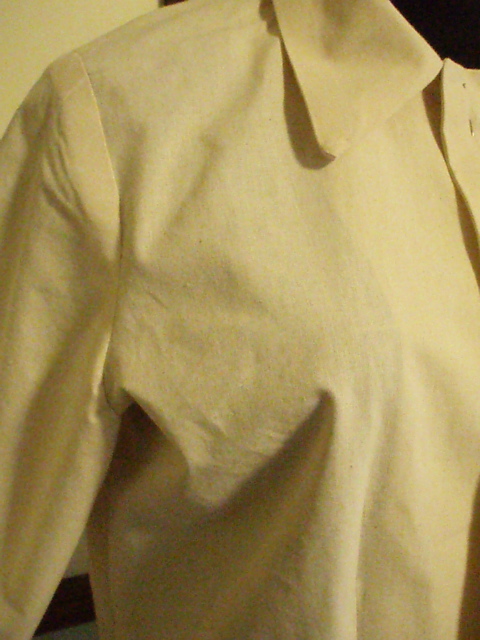
Chanel jackets have this special feature because their construction is not at all like traditional jacket sewing. In a regular, completely machine-sewn jacket, essentially two garments, lining and jacket, are constructed separately and sewn together. Chanel jackets are constructed as a single unit from the inside out, and each seam is enclosed in a logical manner out to the jacket edges, which are done last. So what does all of this hand sewing achieve? You get a jacket that feels like a sweater; soft, comfortable and pliable.

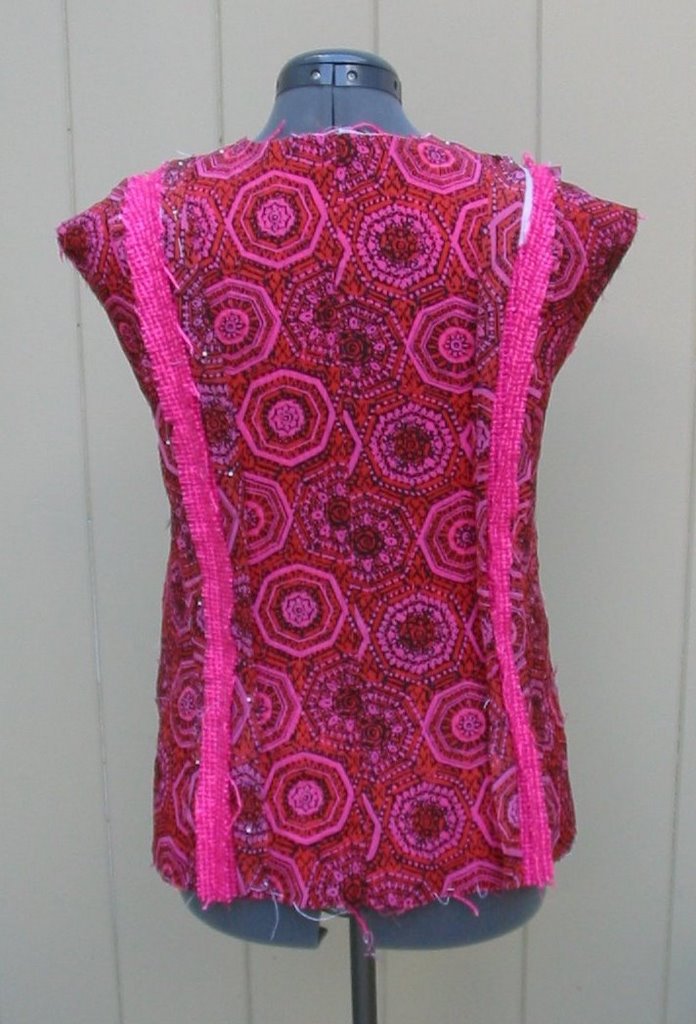
Commonly, in Chanel jackets, there are none of the facings, interfacings, or layers of pad stitched hair canvas commonly used in bespoke and couture tailoring. Rather, you create the jacket from the inside out with just fabric and lining. The jacket lining is quilted directly to the fashion fabric as the first stage of construction.

First, you create blocks of fabric and lining with the wrong sides basted together. The block is thread traced again to outlines the shape of the pattern piece (no seam allowance.) The lining is then quilted to the fabric. The bodice of this jacket is hand quilted, and the sleeves are machine quilted. I can’t remember why I decided to hand quilt the lining – maybe I thought the stitching would show to the front? Well, I ended up doing it by machine for the sleeves, and it’s not noticeable at all. Chanel jackets are machine quilted.

In the traditional Chanel method, each quilted jacket/lining piece is cut out as one. When the seams are sewn, the lining is folded back, the fashion fabric seams are machine stitched and then the lining seams are closed with hand fell stitches. The princess seams were sewn this way.

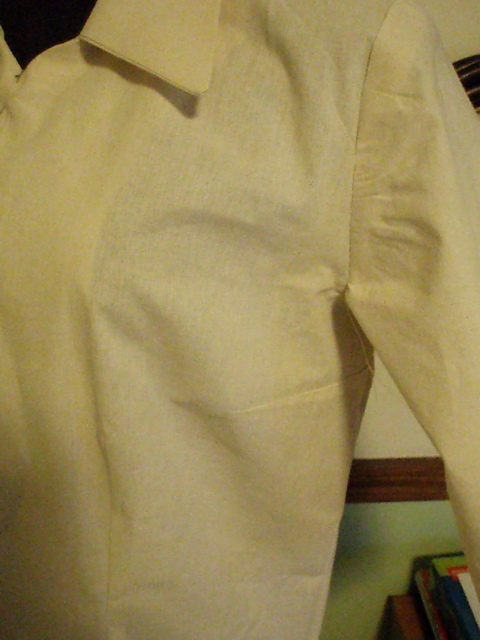
This photo shows the inside of the jacket at this stage. The quilted lining has been folded back so I could machine stitch the vertical seams. Then the lining seams were folded back over and stitched closed by hand with a fell stitch.

For the side and shoulder seams I decided to treat the two fabric layers as one, and according to my research, Chanel also did this occasionally. The princess seam edges were catch stitched down and then covered on the inside of the jacket with a non-bias strip of lining fabric hand fell stitched in place, sort of like a Hong Kong finish.


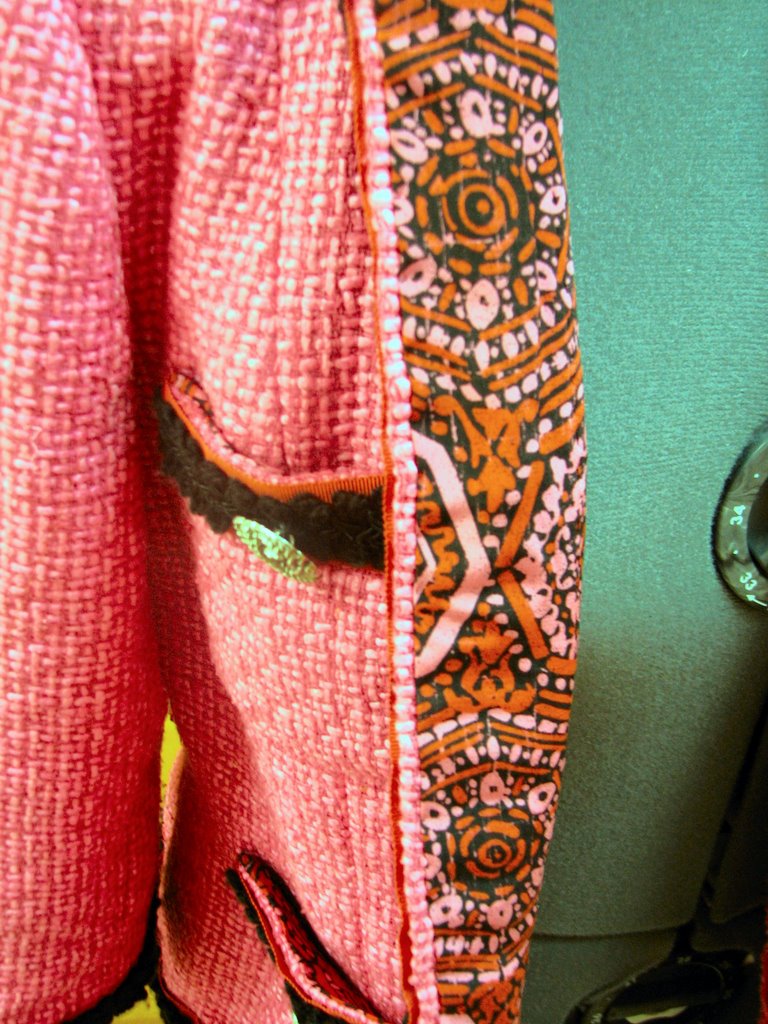
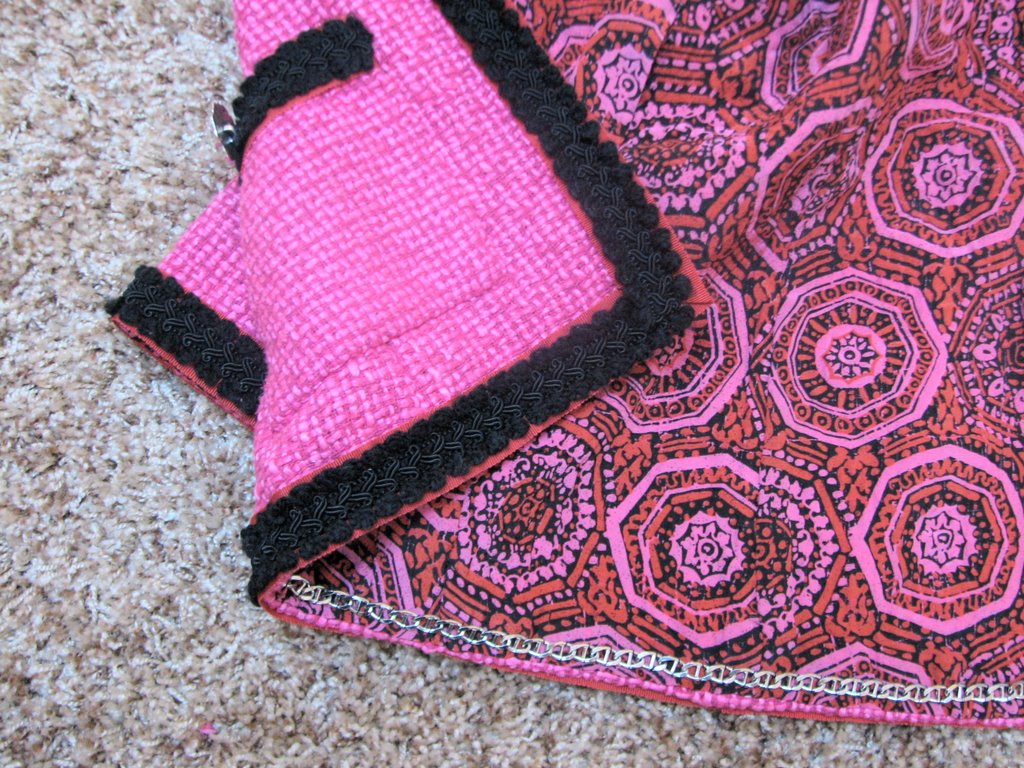
Another distinctive Chanel construction feature involves the famous braided trim. In the traditional method, these are also attached before the edges of the jacket are closed. This assures that none of the machine stitching for the braid shows on the lining of the jacket. After the trim is attached the jacket edges are turned under and basted. The lining is then turned under and basted. Then the lining is hand fell stitched around the jacket edges, as you can see in this photo (the color is off due to the flash – the rest of thephotos show a truer color fabric color.) The pockets are done the same way.

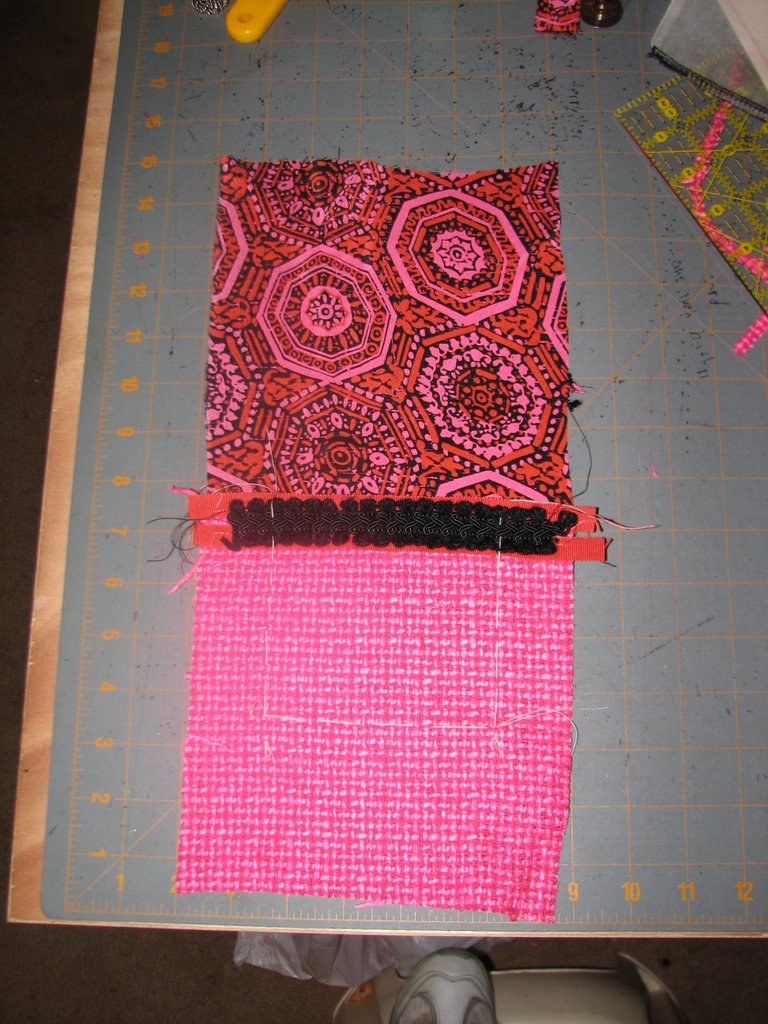
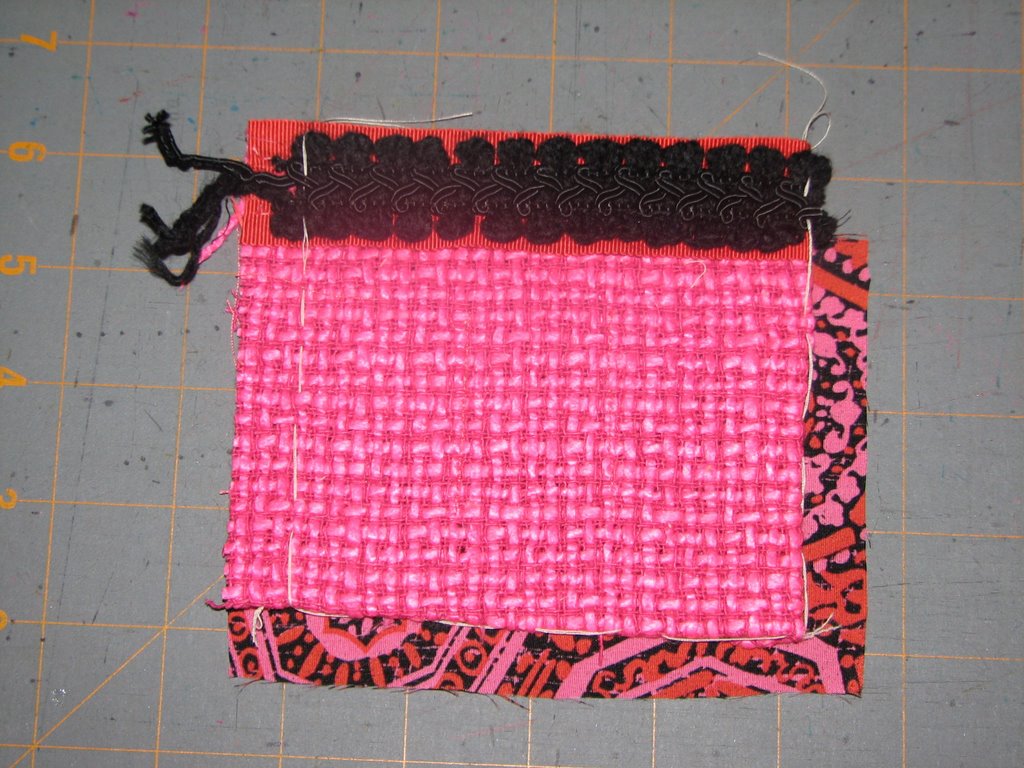
I had to figure out a way to do the pockets myself because none of my sources had much detail about them. So I adapted Cheri Dowd’s method used for the sleeves (details are below) The top edge of the pocket and lining are sewn, then I thread traced the pattern piece (no SA), fold the lining back down, and machine quilted it. Then I cut out the pocket and folded under the seam allowances and fell stitched the seams. Here are photos of a pocket partially complete:

You can also see the braid has been pulled apart. I’ve discovered this is a good way to reduce bulk. Just cut the chain stitching that holds the braid together, pull the pieces apart, stitch them together and trim the ends. This makes it easy to turn under the end of the braid. The braid on the jackets is done this way too, and the edges can just be butted together instead of lapping one end over the other.

This ended up being a UFO because, at the time I started this project, I found no information in my original sources as to how to construct and install the sleeves. Fortunately, Threads came to my rescue, and I used the sleeve method in Cheri Dowd’s article “Shortcuts to a Designer Jacket” in the new Dec‘06/Jan ’07 issue. A complete list of technque sources is on Pattern Review.

Cheri’s technique is ingenious and easy to understand, but I discovered what appear to be three omissions in the article: (1) for best results on a 2 piece sleeve, start quilting from the front underarm seam on the main sleeve piece to keep the quilting aligned with curve of the sleeve, (2) her article is silent on how to manage closing the 2nd underarm seam all the way to the sleeve edge – the quilted lining gets in the way. I ended up sewing the last few inches of this seam by hand, and the braid will cover this stitching. Lastly, (3) Cheri she doesn’t say whether she attaches the braid by machine or by hand, and also doesn’t state at what point in construction this should happen.

If you don’t want the braid stitching to show to the edge to edge lining them you have to sew on the trim as I did for the pockets, before you bag out the jacket. I didn’t realize this until it was too late for the sleeves, and so the braid stitching on the sleeves is sew on by hand because I didn’t want any stitching to show on the inside of the sleeve.

The final steps include attaching the pockets with hand fell stitches, and adding the distinctive curbed chain hem weight – which, incidentally, needs to taken out and sewn back in, by hand naturally, when the jacket is cleaned.

As my mother likes to say, “Sometimes we must sacrifice for fashion.”

Keep on Sewin’!
Phyllis

November 13, 2006

Muslins Matter

Filed under: Fit/Pattern Alterations,Pattern Reviews — Gorgeous Things @ 10:14 am

by Diva Ann, GorgeousThings 

I have just finished the HotPatterns Tango Blouse. It’s a very pretty look, and I wanted to make it in a wavy eyelet that I bought from Kashi at Metro last month. I love the lines of the blouse, and I especially love the sleeves, with their fluted cuffs. I also know that, as with just about any new blouse, I wanted to make this one work out, so I made a muslin. And as always, I’m glad I did.

Even in the event that a pattern fits me with very few changes, making a muslin first allows me to find any glitches or tweaks, and it gives me a dry run on the construction process. I know some of you are rolling your eyes and saying, “A muslin? But that takes too much time!” Well, sorry to be harsh, but get over it people. It’s far less time for me to spend whipping up a basted together shell using cheap fabric (yes, this is the one time that I use cheap fabric), than to cut my good fabric and end up ruining the whole thing. Nothing ticks me off more than having to toss good fabric into the trash because I wanted to save time. I also find that muslins give me a much better view of the fit on my body than, say, tissue fitting. I’m not dissing tissue fitting. I do it. But I find that muslins just work better for me.

Let me show you the process I went through to make my blouse. After tracing off the appropriate size, I cut out the blouse using a stiff muslin I bought from Fabric.com. You can argue that this particular fabric isn’t that great as a muslin for my purposes – it’s much stiffer than my final fabric, which I have washed umpteen times and tea-dyed until it is very soft. But it suits my purpose for showing the drag lines. The first thing I did was lower the waistline darts by an inch. I knew I would have to do that before making the muslin. Then I sewed the test garment together. Here is the result of the first run:

Sharona, my old dress form, doesn’t fill it out quite the same as I do, but you can still see a couple of things. Look at the right front (on your left as you look at the screen). Here’s a close-up:

You notice some drag lines emanating from the shoulder and the armpit. The shoulder lines aren’t a problem when I wear the muslin because my shoulders are much broader than the form. But there was a definite diagonal drag line from the middle of the armscye pointing to the bust. I pinched that out and made a dart from it. I sewed that up on the left front, as you can see here:

This took care of the excess fabric. Then after conferring with my fellow Divas, I rotated that dart to the side seam:

At that point I decided to make a second muslin. Believe it or not, it’s easier and faster to cut out a whole new muslin than ripping my basted seams and resewing everything. I also changed the neckline slightly to give it a more V-neck. This was a styling detail that someone pointed out on PatternReview, and while I like the original neckline, I figured I would try it with a V and see if I like that better. To make the V, I measured to the point on my chest where I wanted the opening, and used my curved ruler to draw the new cutting line. I lengthened the collar by adding 5/8″ at the center back. Here is the result of the second run:

After trying it on, I was satisfied with the fit in the upper chest area. I still needed to adjust the armscye slightly since I had taken some length out of the armhole seam. Again, my dear Divas came to my rescue and showed me how to do that. I was able to transfer all the changes to my final pattern and make the blouse from my eyelet:

Now you may be wondering, how long did all this take? Not very. I cut out and sewed the first two muslins on Saturday afternoon. Yesterday I cut out and sewed most of the blouse (except the sleeve frill and the buttonholes) in less than an hour. It took me another hour to finish it today, but that had more to do with my Pfaff buttonhole being persnickety and not with any major construction issues. The total time I spent on this blouse, from start to finish, was less than 6 hours, maybe even less than 5. The result is very satisfying. The fit is exactly as I want it. I have a “tried and true” pattern now, and I know I can whip one of these together in less than an afternoon. Here’s what the final version looks like on me:

So the moral, dear friends, is don’t be afraid to make muslins. Yep, I mean muslinS plural, if that’s what is necessary. They don’t take that much more time, and the results will be worth every bit of effort, and you will have a garment that you will be proud to wear for a long time.

Happy sewing!

November 11, 2006

Serving Suggestion

Filed under: Designer Inspirations,Fashion,Musings — georgene @ 8:03 am

by Diva Georgene 

I was just quietly reading the New Yorker magazine in bed last night (great reading material to put you to sleep!) when I saw this ad for a Burberry trench coat-

It made me think of the Simplicity Threads trench coat pattern 4084 that many of us rushed out to buy when it first came out a few months ago. Change the belt to a wide sash, and lengthen the cuff ‘belts’ to become ties, and voila! I think I would skip the pocket flaps in the princess seams on the Threads patterns.

How great would this be unlined in a silk paper taffeta for spring? Or if you want it to be functional as a raincoat, some kind of nylon waterproof taffeta? If I channel my mother, she would probably want to see it in a floral taffeta print. ( Not that she ever sewed, but she did have a distinct style that incorporated bright colors and big florals)

Mind you, there is a difference with the collar – the Burberry of the ad is not your traditional banded trench collar that the Threads pattern has reproduced. Let’s see if I get around to making the collar change…somehow I don’t think it will be too hard.

Next Page »

Create a free website or blog at WordPress.com.