THE SEWING DIVAS sewing, design, fashion

November 16, 2009

Dressmaking class in Mago Kenya

Filed under: Dressmaking,Els,Machines,sewing,sewing notions — Els @ 11:22 am
Tags:

Last month my HB and I were traveling in Kenya for 3 weeks and I was lucky to visit a dressmaker’s class in Mago, a small village in Western Kenya.

The Dressmaking/Tailoring class  is a department of a Polytechnic school that was built and financed in 2005 by some Dutch people.

We stayed for 6 days in the guesthouse http://www.magoguesthouse.com/

The stay in the guesthouse  guesthouse provide the needed income for the school. Our oldest son is doing an internship for 6 month there together with his girlfriend Linda, as part of their final year of study of Tourism and Management. They will do the marketing and manage the guesthouse .

The Catering & Hospitality students provide services at the guesthouse .

Our son went to South Africa last April to do some shorter studies and internships at a school in Port Alfred for his  Tourism and Management major.  He bought a Toyota Hilux 4×4 and has driven the old jeep through Swaziland, Tanzania, Lesotho, Zambia, Botswana, Malawi, Mozambique, Zanzibar to Kenya where he started his internship late August and we have missed him terribly.  It was a joy to see him again and to see where he is working now.

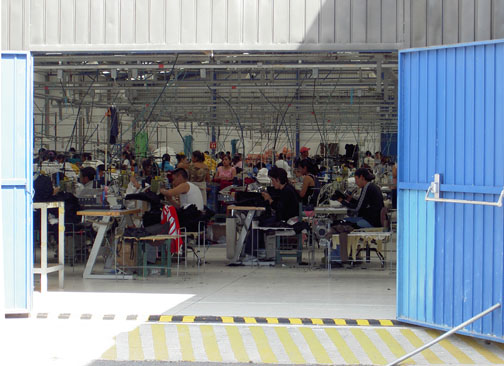
The polytechnic school has several departments for students (age 18-28) to get an education for 2 years in  Motor Vehicle Mechanics, Carpentry & Joinery, Building & Construction , and Tailoring & Dress making.

Motor Vehicle MechanicsCarpentry class

Building and Construction classsewing classroom

dressmaking students at work

I knew beforehand that the school had a dressmaking/tailoring class so I stuffed some possible hard to get fabrics like stretch lace, sewing notions, books: Fit for real people , Sew Any Patch PocketSew Any Set-In Pocket and some  pattern magazines like Burda, Knip and Diana in my suitcase.

I had the pleasure to see the students at work and was welcomed by the teacher and students as a colleague dressmaker.

There are 36 students in the dressmaking class and they learn  pattern drafting and sewing.

The students learn to sew and make samples not using muslin  fabric but they draft a pattern on brown craft paper and learn to sew that paper garment made on ½ scale and this way they learn to know which steps are going to be sewed first.

The students are working in two classrooms, one is for the theory and the other classroom has 24 beautiful Singer treadle machines.

singer treadle machines

Sewing sample

I spend a day at the Dressmaking/tailoring School and shared some sewing techniques, for example I made a sample of a bound buttonhole on a treadle machine that was for me a new experience, since I am used to an electric sewing machine.

I have some vague remembrance of sewing once on a treadle machine in grammar school but since that did happen a long way ago I felt such a beginner sewing on such a machine.

The Singer machines they use are beautiful and well-maintained.

All the dressmakers/tailor shops I saw when we drove through the villages in Kenya are using treadle machines since only a few people are lucky to have access to electricity.

The Dressmaking/Tailoring School is well equipped by Kenyan standards but they could use some better scissors and from my point of view more notions as I happened to find out when I needed to use scissors for cutting some fabric.

As a dressmaker I know that good tools are such a pleasure to work with and will make the sewing part so much more enjoyable.

I tried to find a notion/sewing store in the big cities like Nairobi and Mombasa but I could not find even one.

So once we were home again after our fantastic 3 week vacation traveling in Kenya, I was planning to do some serious shopping for the dressmaking/tailoring class.

I told my parents and sister about my shopping plan and they spontaneously donated money too, so I could buy 36 scissors, thread nippers and seam rippers, plus a large dressmakers shear and pinking shear, plus some other notions which I thought they could use.

notions A

I had some red upholstery leather in my stash from an old leather couch once owned by my sister so I made sheets to protect the scissor blades and made an extra pocket so the seam ripper and thread nipper were all in one place.

sheath36 hoesjes klaar a

It was a lot of work but fun to make since I knew beforehand that those notions would be for a good cause.

Since it is very expensive to ship the 5-kilo scissors to Kenya I was very lucky to find out from one of the Dutch founding member of the board (who started and finance the school)that friends of him would travel to Kenya and could pack the scissors in their suitcases.

So the 165 km drive to another town to hand out the scissors was well spent and was cheaper than shipping with no worry that the scissors could get lost during shipping. The scissors were accepted with great appreciation and will help the students to accomplish their work to become a dressmaker/tailor and start a dressmaking business to earn a living.

The other notions, dressmakers ham and pattern book  Modelling and Flat Cutting for Fashion by Helen Stanley are traveling with the parents of my son’s girlfriend Linda who are leaving tomorrow for their Kenya vacation.

I wish I had the opportunity to do some volunteer work at the Dressmaking/Tailoring school but since that will not be possible I was happy that our family could donate some needed tools to make sewing much more enjoyable and pleasant.

December 21, 2008

Mouse Masticated

Filed under: Machines,Uncategorized — phyllisc @ 7:10 pm

tree-skirt


Here in Massachusetts we were hit with a whopper snowstorm this weekend, so I thought I’d get started on the Rucci dress.  However, that plan was sidelined when I unpacked the Christmas tree skirt and discovered that sometime over the summer $150 worth of  ball fringe trim from G Street Fabrics  had been chewed off of it by garage mice and used for nesting material.

Time for a new tree skirt.

I had some rich burgundy home dec velvet in my stash, and some great silver silk dupioni for a  binding.  The embroidery module of my Bernina 180E had not been used in a while, and I had this cool modernist snowflake design that would look just great on the velvet in various shades of silvery-grey threads.  snowflakeAnd guess what happened?  Well, my ancient (2001) Bernina 180E Artlink software is not compatible with any of the five computers we have in this house.  I didn’t want to shell out $500+ to Bernina for their true editing software because I don’t use the embroidery module all that much, and who the heck knows if it would even work on a Bernina machine from 2001 and a 2007 PC running Vista.  Intense frustration ensued.

So what did I do?  Go onto Ebay and bid on an Dell laptop running Windows ’98 so I can match it up with my 8 year old 180E and its Jurassic era Artlink software.  And sure enough – Ebay has plenty of once $1,000+ laptops for less than $60.  Hopefully I’ll get the snowflakes embroidered in time to  stow away the tree skirt till next Christmas.  Wish me luck with the laptop I’m bidding on.  If I ever sell this Bernina, which as an embroidery machine is depreciating faster than anything GM ever built; I’ll need to include a working laptop with it because no one would ever be able to use the embroidery module without a computer of similiar vintage.  And did I tell you that the sole connection from the sewing machine to the PC is a serial port???  I’d better not lose any of the cables either…

November 4, 2008

Cool tools!

Filed under: Gigi,Machines,Tools,Vintage Sewing — Gigi @ 9:03 pm

I was so bummed out when I saw the super-fantastic Bernina invisible zipper foot #35 wasn’t made in a version to fit my Bernina 1530. 😦 I have a really nice, all-metal invisible zipper foot for my industrial machine and wanted something similar. Up until now, I have been using (and been perfectly satisfied with) the 3-groove pintuck foot to install invisible zips. Still, I was complaining to my friend Greg about how unfair it was that Bernina doesn’t support the older machines. Then he got that Aha! look on his face and wondered aloud if the only difference between the classic feet and the Artista/Activa feet was the shank. I immediately called my friend Sharon (who works at a Bernina dealership) and asked her to bring me the foot in question. We popped off the shank and replaced it with the shank from an old #0 foot I found laying around the shop and there you go – an invisible zipper foot for my 1530! I just love it when a plan comes together. 🙂

bfoot

While rummaging through my friend’s shop lately I’ve found some really, really interesting things. Many, many buttonholers, for one. To be honest, I’ve never had any interest in buttonholers because my machine makes really nice ones. Then, I started playing around with them. Now I own three! This first one is a low-shank buttonholer for use on a straight stitch machine. It actually moves the fabric back and forth – so cool! And check out the awesome buttonholes I made on a scrap of rayon jersey! And, yes, you can adjust the distance between the beads.

bh1

I stitched the buttonhole on the left once and the one on the right twice. You can stitch around up to three times.

bh2

Then Greg thought I might prefer the Singer Professional (for zigzag machines) instead so I tried it and bought two: one low-shank (vertical needle if you are looking on Ebay) for my Singer Genie, Pfaff or my Bernina (using the low-shank adaptor) and a slant version for the Singer 600-series machine which I’m going to keep set up just to make buttonholes. The Singer Professional even has templates for bound buttonholes and a beautiful eyelet. Seriously, these are so inexpensive everyone should have one even if for nothing more than a good keyhole buttonhole!

bh3

Now I can’t wait to try the industrial buttonholer that Greg gave me for my Singer 20U!

Speaking of the Genie, I bought another one recently. I sold mine a few years ago and have always regretted it so I’m happy she’s back. Boy, this one sews like a dream and, at about 11 lbs., is the perfect little machine to toss in the car and much less precious than my Featherweight! This is model 354 (which has one more stitch than the original 353) from 1974.

g1

g2

Lastly, as I may have mentioned, I have been helping my friend sell some old inventory on Ebay. His father opened the shop in 1967 and I don’t think anyone has ever gotten rid of anything so the walls are closing in on us!

We found some really amazing vintage feet and attachments as we were going through boxes, one of which was this wonderful Singer one-thread embroidery attachment (#26538) from the 1920s. Specialty thread, cord or yarn is fed into the attachment and twisted around as the machine stitches the cord down. It’s really incredible. I did a little research and found that the last one sold on Ebay for $169 (!). He said that if I sold two of them for that much he’d gift me the third attachment. Well, he wasn’t joking because, despite my objections, this little gem is now tucked away in my sewing room. I’ll use it to embellish something as soon as I get a chance. How lucky am I?

embattachment

There you go, I don’t post for months and then you can’t shut me up!

February 26, 2008

Elasticated blindstitched neckline finish

Filed under: Gigi,Machines,Tutorials — Gigi @ 1:36 pm

I really love making and wearing surplice neckline tops and dresses. To prevent the neckline from gaping I usually serge a plain lingerie elastic to the wrong side. Once turned in the neckline can then be topstitched or, as I often prefer for a dressier finish, blindstitched by machine. This is by no means a couture – or even fine – finish but it is very nice on sportswear.

First, the machine. This is a true blindstitch machine with a curved needle. Mine is a portable TacSew T-500 that is not as expensive as you might think. I use mine quite a lot. It’s great even if all you do is hem with it!

tacsew

Here’s a link to the T-500 on All Brands. $399 is a great price for this machine! I see it locally for $600-800.

STEP 1: Put the lingerie elastic through the serger for a couple of stitches to secure it.

blind1

STEP 2: Insert your neckline edge and serge the elastic on.

blind2

blind3

STEP 3: Turn the elastic in and machine baste into position on your conventional machine. This may seem like an unnecessary step but it takes so little time and ensures that the elastic doesn’t twist or slide around during blindstitching.

blind4

blind5

STEP 4: Blindstitch just catching the edge of the elastic with your needle.

blind6

Now you can remove the basting stitches. I use a really loose top tension to make it very easy to take out.

After blindstitching:

blind7

The finished product! I used contrasting thread here but had I used matching thread and a white elastic the finish would be virtually invisible. The busier the print, the less noticeable the tiny stitches will be. Also, a blindstitch has plenty of stretch to it making it perfect for hemming knits as well as wovens. It’s great if you are making a top or dress out of a fine knit such as wool jersey or cashmere where you don’t want to use a coverstitch or twin needle.

blind8

Here’s how it looks on a real garment:

burdadress

You can read more about the dress HERE on my personal blog.

Now, I have not tried this technique using the stretch blindhem stitch on my conventional sewing machine. I imagine it would work okay as long as you get the settings just right. I would experiment on scraps first. Better yet, treat yourself to a true blindstitch machine!

July 7, 2007

Setting up the Lines

Filed under: Industry,Machines,Technology — georgene @ 10:18 pm

long-view.jpg

I just got back from a trip to Puebla Mexico to check out a factory that will be doing production for my current project.

I may have been in every industrial backwater in the world from Pakistan to Malaysia via China and India. This place in Mexico was wonderful in comparison to some of the manufacturing areas I have seen, where the ditches run green with effluent and wild pigs cavort in the dusty rags caught in scraggy weeds on vacant lots, next door to the pitted rusting factory. Did I mention that it might be monsoon season and you would be wading thru the muck to get there?

This factory was very clean, modern, and well lit by the skylights you can see bisecting the roof above the main floor. Someone who is much smarter than I am about the industrialization of design flew in to set up the manufacturing lines for the dresses we are about to produce.

newlines.jpg

Here is the first set up with the machines placed in the order of operation. Those bits of cardboard that you see to the side of each machine have a swatch showing the exact operation required at that machine as a reference. Each operation is timed so that the total amount of time per garment can be calculated. Only then can the real actual cost for the garment be established. Until this step is taken, its all estimated.

t-lines.jpg

Here’s a line set up for a simple tee shirt running on the floor while we were there.

checking.jpg

After the garments come off the machine, they are individually checked and loose threads clipped before going to pressing. I like the stand up angled tables this factory uses, and the fact that the mounds of finished pieces are not allowed to become overwhelming. Some places I have been there are huge ziggurats of shirts threatening to engulf the checkers. Just having that never-ending pile would be enough to depress me. In this factory, although the women are on their feet, at least the angled table makes the laying out the garment easier, and relieves neck strain from bending over the table.

sidedoor2.jpg

We left the factory at the end of the afternoon, with the sun still shining on the cornfield next door. Within 20 minutes the seasonal daily downpour started. Once back in Puebla town, the streets were running rivers, and we had to turn back from a few intersections where cars were completely flooded out. A Mexican monsoon moment that was over almost as quickly as it had begun.

Next Page »

Blog at WordPress.com.