HOW I GOT FROM THERE TO HERE
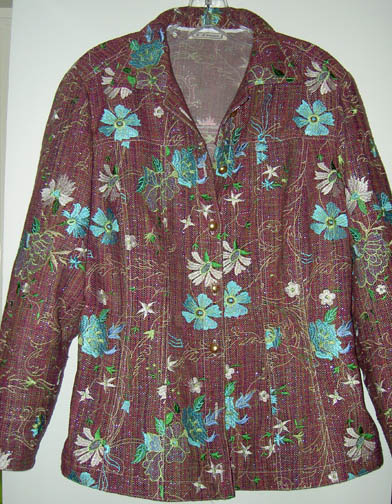
I fell hard for the EmmaOneSock silk tweed with all-over embroidery from Nanette Lepore. It was ruinously expensive – so much so, that I have blocked out the price in my mind. Since I had once managed to make a jacket in 1 ½ yards of fabric, that’s what I bought, with no real idea of what I would make.
The fabric worked on my mind, and I decided that what I really wanted to make was a jeans style jacket, but with an hourglass shape. This fitted denim silhouette was popular some years ago, made best by Jean Paul Gaultier, who has perfected the corset silhouette over many different types of garments, from ball gowns, to bustiers, to jackets.
The thought of drafting such a pattern from scratch was daunting though, as fitting such an item on oneself is no picnic. I set out to find a pattern I could adapt to my needs, something that had a good structure to begin with. I had never worked with a Marfy pattern before, but from all reports it was a good place to begin. Every other jeans style jacket I had looked at was too boxy, or worse, a wedge shape that was narrower at the bottom. Definitely not MY shape!
Marfy F9468

I found the Marfy pattern after much digging, it is an older pattern and not easy to find on the Vogue website. I am not sure if it is still in print. I bought it in March of 07, I believe it is from Fall 06. As it comes out of the envelope it is a shirt, but it has a shaped side seam, and the all important 3 panel front with a shoulder yoke..
THE PATTERN CHANGES
Here are the changes I made to the pattern to get to my jacket:
>Make a straight hem instead of a curve hem, added to the sleeve length for full length sleeve.
>Cut the center front straight up to the neck, with a 1/2″ extension for buttons instead of a curved placket open neck shirt collar.
> No pockets used for this fabric.
>Reduce the collar point to be less of a Boeing 747 spread.
>Change from a set-on placket to fold back facing. I did this only because I had the nightmare silk tweed fabric to deal with. I couldn’t imagine trying to make a straight narrow placket in this fabric, especially with the thickness of the fabric with the embroidery. In fact, it was still tough to wrestle with the yoke seam and the turn back, but since my button fell below the yoke seam and the turn back of the lapel with the collar open was OK, I got off easy. For other fabrics I will make a set-on placket as you usually find on this type of jacket.
Let me just say that the fitting alterations were minimal. I was amazed at how well the pattern went together and fit me right out of the envelope. I did pinch out a bit more bust dart shape in the side panel, which effectively lowered my armhole, but I was able to re-draw it with minimal hassle back on the table after the fitting.
THE CONSTRUCTION DETAILS
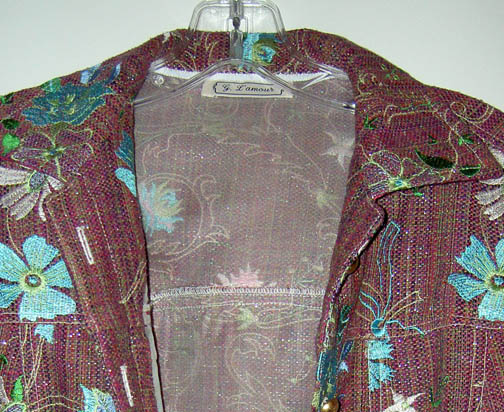
The amount of seaming and topstitching required in this jacket made me choose to underline my fabric with silk organza. This kind of tweed just sort of falls apart when you look at it, it ravels away at the slightest excuse. By adding the layer of silk organza, I was able to do all of the seaming and topstitching without worrying. I had a denim jacket to refer to, to see how the seaming was done. This helped a lot, as Marfy provides no seam allowances and no instuctions. I had traced off their pattern, and then made a muslin to test the fit before I cut into my [ridiculously expensive] EOS fabric… no second chance with this!
Of course, with 1 ½ yards of fabric, I had to squeeze the pattern pieces into the layout. I needed to cut the undercollar, a hem and cuff facing from another fabric, as there was no way to fit it in. Actually this was a good thing, since my silk/wool blend was much smoother, thinner, and easier to work with than the silk tweed. It did cut down on the bulk.
SEWING NOTES:
All of my pieces were underlined. I basted my silk organza from Thai Silks to the fashion fabric, and basted at the seam line as well. I sewed the body seams front and back, then serged the seam allowances together (something I learned from my denim jacket that I followed.) Once the panels were together, I did my double needle topstitch. (Used heavy topstitch thread – nothing else showed up). I applied the yoke and seamed the same way. I had to use a 1/4″ grosgrain ribbon at the inside back neck, as it was impossible ot turn the seam allowance and topstitch. This eliminated a whole bunch of thickness, and gave a nice clean finish.

For the side seams, the armholes and sleeves, the seams were serged separately before sewing the seams together, as there is no double needle on these seams.

I confess, I took the jacket to a tailor for the buttonholes – my machine, and my nerves were not up to it.
I just want to say that this is now a TNT pattern, and I will be using it again and again, probably for the rest of my life. It’s a classic and stands the test of time.


 Subscribe with Bloglines