THE SEWING DIVAS sewing, design, fashion

February 27, 2007

Pressing equipment part 2

Filed under: Els,Notions,Pressing,Tools — Els @ 6:00 am

Since there were some questions asked by readers of the previous post I will try to answer those.

Pressing tools like hams,  clappers, steam rolls  can be ordered from suppliers of tailoring tools like wardrobesupplies  or greenburg-hammer in the USA.

Pressing aids from the UK

Different shaped tailor’s hams from my supplier in The Netherlands

Some of you asked for information about where to look for the press buck ( persbok)

To my knowledge this rectangle one is a Dutch design, made for a  tailoring course at a fashion school, I never saw this rectangle shape outside The Netherlands.

And I was lucky to find one at a Dutch Auction site.

If you are interested in buying one, let me know and I can look around to see if I can find another one.

Press bucks and tailoring hams are used by tailors and dressmakers and are available in different shapes and have different pressing features, like you can see from these German tailor suppliers, the press bucks  from  schlemming.de  are velvet covered . Like this one.

The bucks from  k-m-versand  are covered with linen.

ebay has an auction for a bügelblock covered with linen right now

I could not find any information about ordering from outside Germany, but it will give you an idea what kind of bucks are used in tailoring and dressmaking.

At the famous vintagesewinginfo website you can find lots of info for pressing  like pressing needs for pressing ,

scope of tailoring 

Pressing techniques can be found in a lot of vintage tailoring/ dressmaking books .

A  pattern for making different kinds of pressing hams and a ham holder can be bought from fiber-images.com

February 22, 2007

Pressing equipment part 1

Filed under: Els,Machines,Notions,Pressing — Els @ 7:00 am

Like anyone who sews, we all know the important part of sewing is pressing. It starts with preshrinking the fabric prior to cutting  the fabric, but also the pressing which takes place in the process of sewing the garment.

Ann already showed in Threads magazine issue 126 how to use  some pressing tools and if you missed that article you can see Ann’s video clip Pressing tools

My pressing equipment: a vacuum suction pressing board , steam iron with a 3,5 liter water tank, the  sleeve board is turned under the board .My pressing board is 116 cm long ( 45 inch) and 38 cm wide ( 15 inch) The pedal on the ground is used for the suction function.My press iron has a Teflon cover.

pressing station 3,5 liter water tank vacuum suction board

You can see the sleeve board ready to use.

 My singer press which I use  for fusing interfacing

Besides the use of the oval shaped edge of the pressing and sleeve board, I use several pressing tools, like this large tailor’s ham for any contoured  shapes or curves  like princes seams in jackets, coats and dresses. 

This small one , which I covered on one side with a piece of wool crepe fabric I use for bust and waist darts and collars, sleeve cap easing etc.

I have a June Tailor hamholder but I hardly use it, maybe because it does not fit my small tailor’s ham very well. Probably the size of the US tailor’s hams are different than my Dutch one.

You can see the difference of the two hams in size now they are on top of each-other.

A press buck ( in Dutch called pers bok) which has a different shape,  straight lines and curved corners. The buck has a wooden base and legs, the size of the rectangle is 31 cm ( 12,5 inch) wide 22 cm ( 8,5 inch) the padding is 5 cm thick ( 2 inch) The total height is 23 cm ( 9 inch) which is lower than the all known oval shaped ham.

The advantage of this press buck is the different shape and size above the other 2 hams.Use for pressing seams open like shoulders, bust area, neckline, collars and darts .

I bought this buck last year for only € 16.00 it is a used one but still in a very good condition. New ones costs about € 50.00. Tailor hams are expensive but will last a lifetime. 

Point presser/clapper is a great tool to press seams open and to beat the steam into the fabric to flatten bulky edges.

Point turner to press open for the hard to reach seams where the point presser is of no help.


But also a wooden spoon is a great tool, even a wooden chopstick can be helpful.

 Also a toothpick or large embroidery needle with a blunt end helps to press a dart open,

I inherited this press block from my grandfather who was a tailor but I only show you this because it is old one (about 80 years)  and not very smooth anymore , but I keep this for sentimental value.

I asked a timber to make me some new press blocks from steamed beech wood because the advantage of steamed beech wood is, it will not bend out of shape .


The large block is great for pressing seams open like pants or any long seams, and I use those blocks to flatten seams while cooling down.

You can see a detailed picture of the shape of these blocks here, the small one is a rectangle while the large one is a curved one. They can also be used by pressing the seams open or to flatten the edges from a jacket or coat while the fabric is cooling down.

The seam roll is made from a Saturday newspaper tightly rolled and covered with 2 layers of fabric, the first one is cotton the second layer of wool fabric .

The handle of a  shoe-brush made of unvarnished wood is also helpful as a pressing block and the brush side I use for removing threads or brush fabric.


For sleeves I use the sleeve board but sometimes the arm roll gets some use too, this one is made to use with a dress form but I like to use it as a seam roll for a 2 piece sleeve. Here you can  see the upper side.

The underside of the arm.

Card board rolls for ironing or pressing very long seams,

As press cloths I use silk organza

As well as fine linen cloths.

I made a sort of mitt from 4 layers of heavy Terry which  can be helpful if I need to press any small curved seam.

 There are many ways to prevent pressing imprints like,

 brown paper strips.

Templar sheets used for appliques are a great tool to prevent pressing imprints.

 I cut the desired shape for example if I need to press a bound buttonhole.

 Pressing a bound buttonhole form the inside , you can see the Templar sheet is placed around the bound buttonhole edges.

No visible pressing imprints.

Because you can cut the desired shape I use those sheets too for pressing mitered corners on a skirt or jacket hem.  

A teflon sheet is also a helping hand ,

To seal, seam seal tape for covering the seams in rain coats.

Another tool which I inherited from my grandfather was a wooden hat shaping block, and I found it very useful to use as a pressing aid when I made a hat and needed to press the seams open. Here you can see the hat block closed.

And open.

February 19, 2007

The Sewing Divas is a beSewStylish.com BFF!

Filed under: Divas in the Press — Gorgeous Things @ 3:40 pm

This is rather fun. I was perusing Taunton Press’ new beSewStylish website, and in their blogroll of Favorites, what should be there but The Sewing Divas! That’s nice recognition, and unsolicited, which makes it even nicer. Three of us (Georgene, Gigi, and Gorgeous Things) are occasional contributors to Threads, but none of us had any idea that this blog was going to be listed. If you are a new sewist, I highly recommend beSewStylish and the companion publication, SewStylish. They have lots of tips in one place, and are laid out in an easy-to-read format.

Happy Sewing!

February 13, 2007

Can Internet Swatching be Far Behind?

Filed under: Business Tools,Technology — Gorgeous Things @ 4:58 pm

DH sent me a link from NewScientist,com news service. Researchers in Europe have been working on, with some success, a new glove that will allow users to “feel’ fabrics over the Internet. The article reads:

‘Detailed measurements of a fabric’s stress, strain and deformation properties are fed into a computer, recreating it virtually. Two new physical interfaces then allow users to interact with these virtual fabrics – an exoskeleton glove with a powered mechanical control system attached to the back and an array of moving pins under each finger. The “haptic” glove exerts a force on the wearer’s fingers to provide the sensation of manipulating the fabric, while the “touching” pins convey a tactile sense of the material’s texture.’

Alright! For those of you who have avoided shopping for fabrics on the internet, this may provide you the opportunity you have been waiting for. While the practical uses in the near term will probably be limited to communications between manufacturers and designers situated in Europe and the Americas, and their textile mills in the Far East. Imagine the possibilities for the home marketplace down the line. Who knows, some day you may be able to rub your hands along different silk crepes or woolen boucles. How fun would it be to ‘handle’ Linton Tweeds from the comfort of your own home? Sewing Diva Heaven.

Read the article in its entirety Here

Happy Virtual Swatching!

February 5, 2007

Centered Zipper Application – One Method

Filed under: Closures,Gorgeous Things,Tutorials — Gorgeous Things @ 6:37 pm

I was working on my bias shirt today, installing the zipper in the back. It’s a centered application, which I actually like, but it can have disastrous results if not done properly. So I thought, “Hmmm, maybe there’s a tutorial here that might help some folks. So here you go. This way works for me; hopefully it can help you too.

Step 1 – Sew the Seam
You have to start somewhere, and the seam is a logical place, right? Sew your seam up to the point at which your zipper starts, or ends, or both:
Sew to the zipper’s end point, baste the rest of the way.

Baste the remainder of the seam closed, and press the seam allowances open.
You can never press too thoroughly, just too hard.

Step 2 – Hand Baste the Zipper Into Place
This is probably the most critical part of the whole operation. In most commercial patterns, the instructions tell you to machine baste the zipper in place, then sew in place. The problem is that with most fabrics, machine basting will cause slippage, and then when you sew the zipper, you will get bubbles and puckers, the hallmarks of “Happy Hands at Home” syndrome.
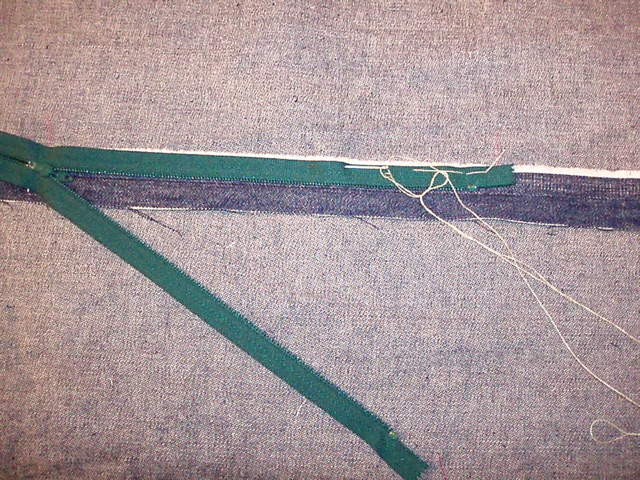
Instead, try this. Place the zipper at your markings, open it completely. Then starting at the top of the zipper, hand baste in place using long running stitches:
Open wide and say ahhhh…

Notice something in the picture. The zipper teeth are set very slightly back from the basted seam, probably a scant 1/16th of an inch. This will keep you from getting “zipper gaposis”.

Same process, different side
Next, close the zipper and baste the other side. Here again, you will want to pull the zipper toward the raw edge of the seam as you baste so that, when opened, the teeth are ever so slightly offset from the folded over seam allowance to keep the gaposis at bay.

Step 3 – Sew on the Outside
Once you have your zipper basted in place, sew down one side of it using your zipper foot on your sewing machine.
6-sew-one-side.jpg

There is only one tricky part to this operation. To keep from getting a stitch “bubble” around the zipper pull, open the zipper before starting sewing. Once you get about half way down the zipper, drop the needle into the fabric, lift the presser foot, and carefully close the zipper (you’ll be working from the underside of the fabric). Once the zipper is closed, lower the presser foot and continue sewing. Pivot at the bottom of the zipper, and sew to, but not all the way across, the zipper, avoiding the metal zipper stop.
Don’t cross that line!

Repeat this step on the other side. Here’s the other important part: To avoid needless bubbles and distortion, start at the same place, but on the other side of the zipper, so you sew both sides in the same direction.
Seams to the left, seams to the right…

Step 4 – Finishing
Once you have the zipper sewn in place, remove all the basting and press carefully. Voila – a perfectly placed zipper with no bubbles!
Zipper, centered and covered

Next Page »

Create a free website or blog at WordPress.com.