THE SEWING DIVAS sewing, design, fashion

January 15, 2010

Pumping Up The Volume of a Flat Collar

From this partly shirred polyester taffeta fabric I made a blouse.

I drafted a princess line blouse with a large wide shawl collar to add some drama.

When the blouse was done and I tried it on I was not happy with the collar design and appearance, to me it appealed too flat . I wanted a more voluminous collar and although the fabric has a bit of volume itself due to the shirring it was not enough to my taste.

I shared my dilemma to my good friend and colleague Neeltje  to change the collar design into a more voluminous collar, and she remembered seeing a voluminous collar  in a pattern magazine “Knipmode” where the outer edge of the collar was flat and a narrow tape separated the ruffled upper collar part from the flat outer edge.

 I used my self drafted collar pattern and made a new one by using a so-called slash and spread method to add some volume.

Flat collar pattern

                                             volume collar pattern

Copied the collar pattern included the in and outer edge seam allowance and added 6 inches (15 cm) in length for a half pattern by slashing and spreading the pattern towards the outer edge only.

I also added 1 cm in width and used a scare ½ cm seam allowance for the outer edge.

 So I had to remove the neckline facing and the upper collar at the neckline.

I kept 1 inch (2,5 cm) wide from the  flat upper collar outer edge intact  and  basted it towards the under collar.

Copied the collar pattern included the in and outer edge seam allowance and added 6 inches (15 cm) in length for a half pattern by slashing and spreading the pattern towards the outer edge only.

I also added 1 cm in width and used a scare ½ cm seam allowance for the outer edge.

Since the outer edge of the upper collar will be flat the upper collar needs to be eased in for the extra length and the volume effect is due to the added width total 1 1/4 inch (3 cm).

Made a test sample from another piece of polyester taffeta fabric.

and made a  new voluminous upper collar.

I stitched the 1/4 inch (6 mm) wide bias tape on both outer edges with the new eased in upper collar lying underneath the tape butted at the flat cut off outer edge and finished the collar and facing as usual.

The bias tape and facings for the front, neckline, sleeve and blouse hem are

made using the same fabric but without the shirring (removed the elastic thread shirring with my seam ripper) because I wanted a smooth fabric for the facings and hems.

detail picture back side elastic shirring:

Facing center front:

                                  facing  hem:

The seams are finished with a three-thread serger and bound with a very lightweight nylon tape.

For a more dramatic way I can wear the blouse with the collar standing up:


I like my pumped up volume collar and it was worth the effort the work involved.

Flat collar versus voluminous collar:

May 9, 2009

Flared hem skirt

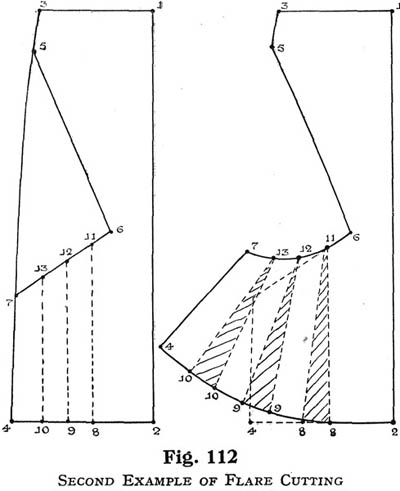
I made a new skirt for my mother ( 88 years ) from a wool polyester fabric to match a rtw jacket, and used a design sample draft I found years ago on ebay, I downloaded the picture probably from a pattern-drafting book but I forgot  the book title. If anyone knows from which book this picture is please tell.

 The design is made by changing a straight skirt into a flared one.

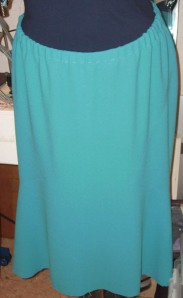
skirt design a

I already made this skirt last year  but that one had a center front seam because I had not enough fabric to cut it on fold.

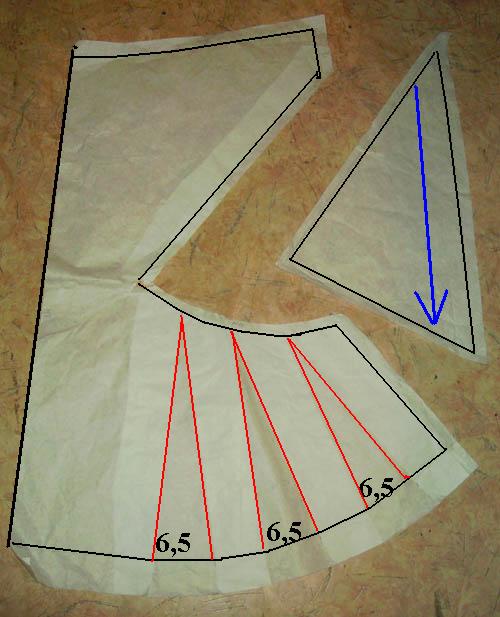
Slash and spread is all what is needed to make this skirt design. I added  6,5  cm between the slashes.

I started with a straight skirt pattern drafted on her measurements and draw lines on the front .

The skirt back pattern is just a straight skirt , only the front has flares towards the side seams.

 Skirt I made last year had a center front seam because I had not enough fabric to cut the center front on the fold.

Front                                                                                                                                    Back

front  back


This time I had enough fabric so no center seam.

slashed pattern

I made the pattern with added seam allowances , 1 cm for the inner corner and separate inset piece and 1.5 cm for the side seams; hem depth is 4 cm. Serging the seam allowances for the fabric, and for the lining I choose to finish the inner corner with a pinking shear with a less wide SA about ½ -3/4 cm.

 The inner corner of the front piece of the skirt fabric and lining are stabilized with a piece of fusible interfacing.

inset wrong side a


Sewing the insert piece, pressed the seams open first and together again so they will lay towards the CF and towards the hem.

side view

The skirt has an invisible zipperat the CB and a contoured front waistband and a straight waistband at the back side due to her posture.CF length 67 cm, Left side seam 71 cm, right side seam 69 cm, CB lenght 74 cm. The waistband is closed using a button and buttonhole.

I sewed the waistband first at the edge and graded the seams , sewed the skirt with a 1 cm seam allowance at the front side waistband and the back side waistband towards the lining with 1 cm sa.

The sa from the skirt and front waistband are pressed towards the waistband, while the sa from the lining and backside waistband are pressed towards the lining skirt.

This will result in a more smooth waistband seam and not a bulky one which has 4 layers of seam allowances inside the waistband.

The waistband was top stitched a hairline away from the skirt seam

contoured waistband a

It is a bit of flurry picture but you get an idea how this skirt falls.

front side a

I inserted a piece of elastic inside the waistband, because my mother likes that.

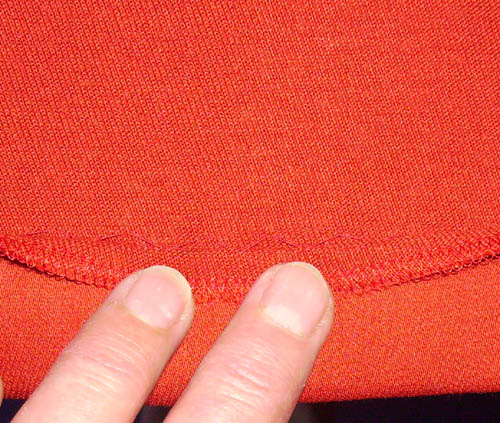
I used  a 4 cm deep hem and hand stitched the hem about 1 cm from the edge so no imprints,


hem stitch 

 This skirt design is a nice one if you want to add some flare at the front hem but do not want to add more wide at the hip line. The back side is just a straight skirt.

P.S. 

You can add some flare to the side seam starting at a point somewhere below the hip line but the original side seam length should match the new flared side seam.

flared skirt
You can see on the example design sketch that the cut out triangle inset side seam is longer than the space between point 7 and 4 from the skirt  because of the added flares. Sewing the triangle inset makes this skirt design to flare out towards the front.

April 14, 2009

Pocket ( No sagging)

How to make double welt pockets is covered in most sewing books as well as via shared tutorials by other bloggers like by Paco see here and another way here

I will show you another way in another post.

Any slashed pocket like double welt, single welt or welt with flap pockets tend to sag if you actual use them to put something in it. 

 I always tell my husband to never use the outer pockets from his RTW suits except for a piece of paper because those pockets will sag.

But if you make your own suit jacket or coat you can prevent the sagging by using a tailors trick in sewing the pocket bag ( interior)

I learned this trick about 20 years ago during a tailoring course I took from a Dutch tailor, and I have no idea if this way of making a pocket is done by all tailors in Europe but I have never seen this technigue mentioned in tailoring books. So I thought  this trick could be of use for all of  you who are making a coat or jacket with horizontal slashed pockets .For angled pocket openings there are other ways to prevent sagging.

It does not take more than a few seconds, an iron and 2 inch/ 5 cm extra length of  fabric or pocketing for the pocket bag ( Pocketing is a sturdy cotton or  polyester rayon ( viscose)  fabric used for pocket bags)  but the difference in huge.

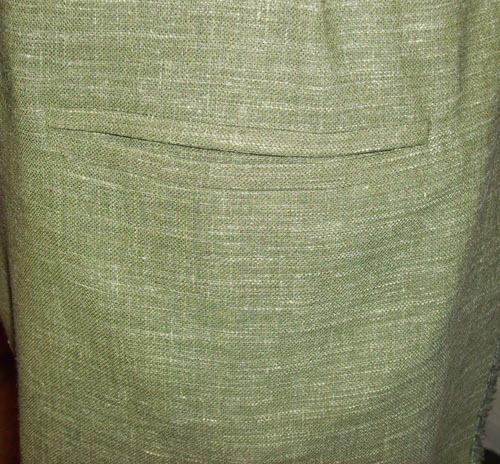
I made a sample double welt pocket and hung the fabric on a dress form to mimic a jacket or coat

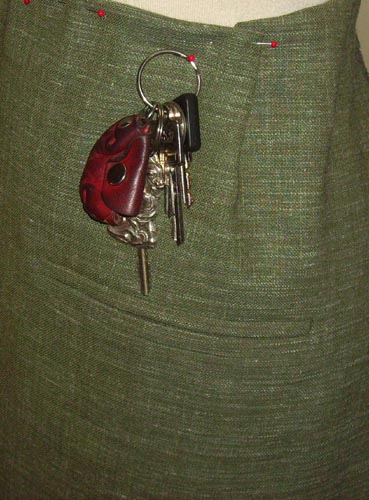
here you can see the keys I used to put  in the pocket

keys 

 pocket sagging due to the weight of the keys,

pocket-saggs

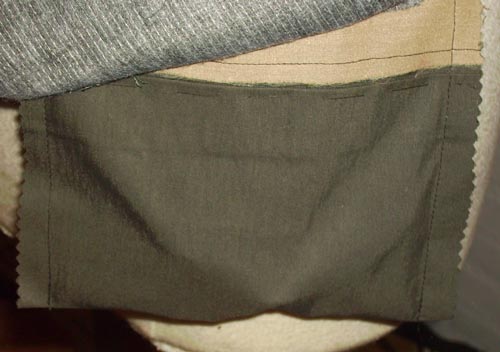
The inside view of the bag with the keys inside

 inside-keys-

(more…)

July 29, 2008

Pants pattern alteration

Filed under: Fit/Pattern Alterations,Tutorials — Els @ 1:22 pm
Tags:

Alterations pants pattern for athletic or full ( aka heavy) thighs front side only.

Since a lot of women develop heavy front thighs due to sport activities like swimming, running etc. which cause the front pants legs to be too snug at the upper thighs.

 Adding wide to the front pants pattern can help to achieve a better fit.

 Measure your thighs at 2 inches below the crotch, next measure the pants pattern front and back at the same height 2 inches below the crotch the total width of your pattern must be your thighs width + 2-3 inches ( 5-7,5 cm)

For example, if your patternwidth is 1 inch short in width you can add that amount at the front pattern.
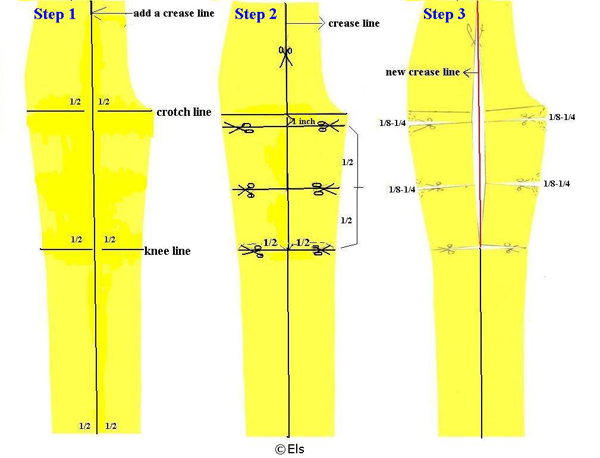
If your pants pattern has a crease line you can start from there , if your pattern doesn’t  have a crease line, draw one see step 1 at the diagram.


Draw a horizontal line at the front pattern, 1 inch below the crotch line from side seam to inner leg seam.
Measure the space between this new line till knee height and divide this in 2 and draw a horizontal line halfway.

Cut the front crease line from the waistline towards the knee and cut open the 3 new horizontal lines. See step 2

Add a piece of paper under the slashed pattern and spread the pattern parts like the example diagram see Step 3
Draw a new crease line from the knee up to the waist, add at both sides of the new crease line ½ inch at upper thigh .The side seams inner and outer leg are now spread for about 1/8 -1/4 inch. You can ease in those inches (1/8 till ¼ inch) so the front side seam fits the backside seam again.

If your front pattern needs more than 1 inch then I would suggest to use a larger size pattern because otherwise the space at inseam and side seam lines are increasing too much and easing in will not be possible anymore.

Blog at WordPress.com.