THE SEWING DIVAS sewing, design, fashion

October 4, 2009

Gail Gondek at The Center for Pattern Design Conference

 San Francisco California Oct 2, 2009
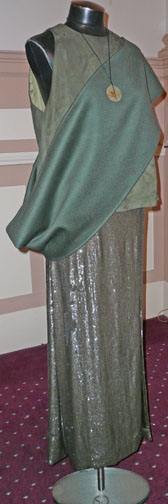
evening ensembleSilk charmeuse lined suede shell with pick stitch detail around armholes and hem over sequined skirt. Worn with a silk/wool angled circle wrap and stone disk pendant on a black silk cord. – Gail Gondek patterns for Ralph Rucci

The Center for Pattern Design held its first annual conference on Saturday. Pattern designers and educators from near and far came to talk about their art, and listen to a great group of people involved in designing and making patterns at the all day conference.

Julian Roberts spoke about his methods of subtraction cutting, with great folded paper demos of how it’s done, along with some of dresses made by participants at the previous day’s hands-on workshop.

The keynote speaker was Gail Gondek, who has designed patterns for Ralph Rucci and Peter Som, after many years working with Geoffrey Beene. She talked about some of her experiences working with a designer to create their vision in cloth, about the process of taking a design from concept to the runway. Afterwards, we got to look at some of her pieces from Ralph Rucci, inside and out.

Wtih Gail’s permission, I took a few photos to share with you, knowing you would love to see some of these details as much as I did.

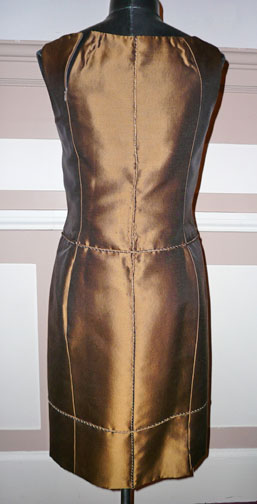
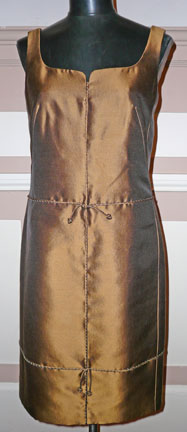
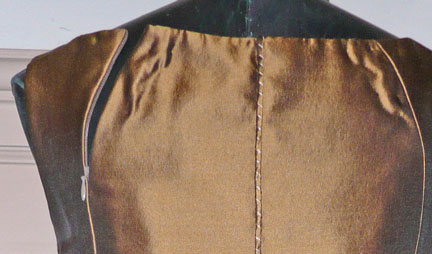
This silk dress had his signature back zipper set into the side panel instead of the center back seam.
dressdress back detaildress back


Here’s a detail of the front of this dress. A spaghetti cording is whipped to the body with silk embroidery thread, the same detail as seen on the center back.
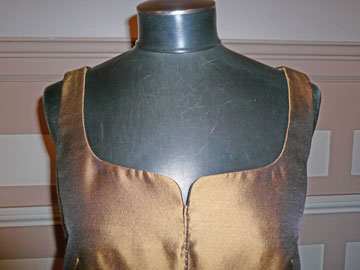
dress top

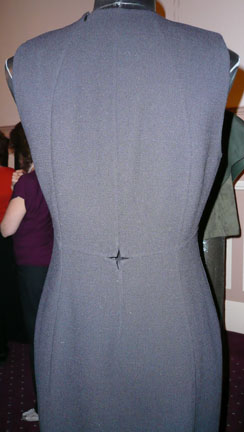
I loved the easy ‘floating away from the body’ shape of this black sheath dress –
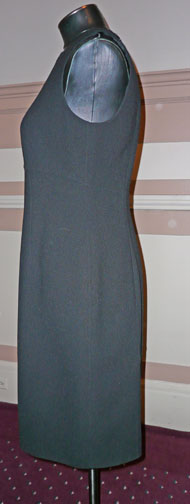
sheath sidesheath backsheath back detail


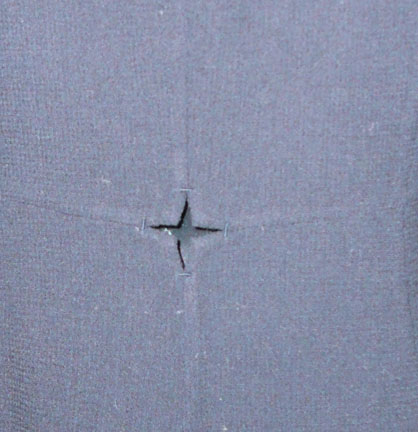
Check out its lovely little peek-a-boo detail at the lower center back – just a little surprise – in an area where most women still can show a flash of skin and get away with it, no matter what your age. The display mannequins are covered in black leather, so the contrast doesn’t show up so much as it would if skin was showing thru the cut out.

The fabric is a double face wool crepe – a truly wonderful soft but firm hand. That’s a fabric that I will have to look into. If you have seen any in your travels, let us know!


The peek-a-boo detail was used on this jacket as well, on both the front and back. The contrast satin insets at the waist seam are a nice touch too.
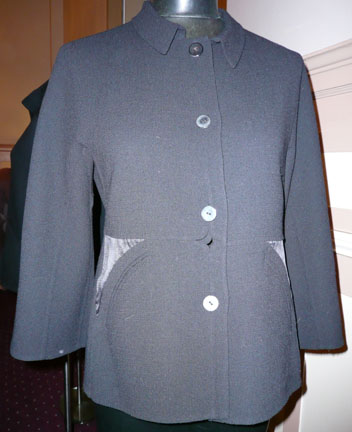
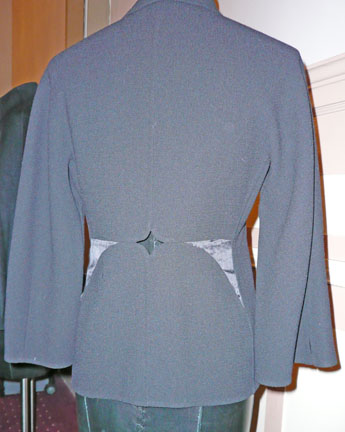
jacket frontjacket back


Sigh! Wouldn’t this jacket just be lovely over that sheath dress…??

Thanks to Gail for sharing some of her great work. I am looking forward to next year’s conference already.

August 20, 2009

Vogue 1132, Fall 2009

Filed under: Mary Beth,Pattern Drafting,Pattern Reviews — Mary Beth @ 4:02 pm

A tricky, tricky pattern….  Did it attract your attention when you first saw it?  I know many liked it:  so urbane and stylish in Vogue’s envelope photo with it’s bias cut wide A-line (not circle) skirt, nipped waist  and flounced peplum.

V1132

It is offered in size 8 (bust 31.5, waist 24, hip 33.5) to size 22 (bust 44, waist 37, hip 46).

Let me start by saying that this is the hardest post I’ve ever done since I started blogging in 2006.    I have taken days to work up my courage.   I have had a total Blogger’s Meltdown and been paralyzed with fear.

This is a test.  It is not a wearable muslin.  Please don’t tell me how to fix this thing.

Just take the facts from this humiliating and public display of raw, un-photoshopped photos and determine if this is really a style that would work for you. Warning:  some photos maybe too graphic for delicate sensibilities.  Viewer discretion is advised.

First:  the skirt is 36″ long from the waist and 98″ in circumference at the hem.  That’s a whole lot of skirt for a short person and even a whole lot of skirt for a tall person.  It might work for someone who is over 6 foot tall.  I am not.  I ran up a test of my test to try to get a good length, cutting off 10 inches so it would be long but not too long and decided on this proportion for me:

Test Skirt

OK, the length is not bad but look at how the skirt front dips down? That’s because the waist band needs to be tighter to hold the skirt level at the waist. So cut it smaller than you normally would.

Also oddly, there is only one pattern piece for the front and the back. A back piece should be wider than the front by an inch or so as most people are wider across the back.

I only had an RPL (rayon polyester lycra) in a comparably sized plaid and I had plenty of it with no real plans for a serious garment. It is a bit beefier than a woven wool suiting but not by much so it became my “muslin” fabric.

Here’s the skirt:

skirt back

The plaid on the bias widens the back view…need I say more? It demands a jacket.

Here’s the jacket:

full back

Hmmmm, maybe I can stand to see it from the front???

side front

Oh , no, not so good either…well maybe a quarter turn will do?

back

Enough with the plaid already!

Not even adding a wide belt would help.

Perhaps done in a more muted plaid like the dark grey shown on the envelope…naw.  I don’t think that this jacket and skirt would work well together on anyone shorter than 6 foot tall and really, it’s not a good look for anyone who is over a size 2.  Oh wait, it’s not offered in a size 2.

So, to get on with this exploration and to relieve our eyes I’ll try to discuss the jacket while in some brown slacks

Jback

that’s a bit of relief from the plaid but, HMMMMM,  that peplum sticking out there…

Side

It might lie flatter if made from a fabric with a looser weave but here’s the pattern pieces:

Peplum pieces

On top of the fact that there’s almost one and a half full circles of fabric over your behind, the jacket instructions and lining pattern piece have you line to the edge so there is an added line of stitching to stiffen those folds.

And the lining shows in the folds (you’re not warned, too bad I didn’t read the whole instruction sheet first!)

Peplum Lifted

Huh? You can’t see that in the photos on the envelope

100_1310

I even have toyed with the idea of tacking the back folds into place but

what about those sleeves? They look nice and tight in the photo, even the armscye is low enough so as to compensate for the tightness of the sleeve

Sleeve Taper

but the pattern piece does not taper as much as it should to produce such tight sleeves

Sleeve Pattern piece

Refer back up to my jacket photos. I have cut an 18 and taken out an extra inch of width tapering from the elbow dart down to the sleeve hem.

Hmmm.   Somehow, it just does not look like the same outfit.

So my dear readers (I hope after these shocking photos I can still call you friends) I am going to close this chapter now.  I have mustered up the courage to post this and, if I were a rational person, I’d go on a week long vacation or a major margarita bender, which ever comes easiest, but when it comes to sewing and art, I’m just not that rational.

No loss to me of the fabric and my time is not as precious as it once was.  I’ll be all right.

I hope I have saved at least one of  you some time, fabric and effort.

sewing hugs to all 🙂

August 1, 2009

Victoria Jones Collection 001 plus Gathering Tutorial

001

I have been wanting to make up something from this indy pattern maker for a long time and decided to make up this pattern when my favorite summer lounging dress, a loose translation of KwikSew 2645 needed mending
KS2645b

I chose pattern #001 because it is being discontinued according to the Postscript at the the Victoria Jones Collection website.

I also wanted to learn:

several pattern making secrets in this design which give you an hourglass shape. The waistline tucks are subtle, and there is still plenty of ease with 6″ of extra room in the waist.

from the pattern description

That cinched it. I must try this pattern! I found the instructions to be great for a beginner with more advanced dressmaking techniques well explained than is usually included in a pattern from the big pattern companies. Indeed the designer urges you to call her if you have any questions or need to size up or down beyond the pattern’s sizing.

The only anomaly I found in this pattern was that I saw no reason to line the lower band, not big deal in my book. You’ll be in good hands following this designer’s directions.

Click the images below for a readable version of the front and back of the pattern envelope. If you need an even bigger version, click on “all sizes” on the Flikr page and then choose the largest size.

pattern back pattern front

I cut size 18 throughout this first version, using linens from my stash in-house store.
Bodice Close-up

bodice-1

This is a classic Victorian “Gibson Girl” shape with extended front yokes and very full sleeves with stiffened, interfaced sleeve heads. The yoke extends beyond the scye line, an example of which is shown below.

Heath
Illustration #63 from Coat & Skirt Making, by Samuel Heath, 1978, ISBN 0 258 96817 6.

I hard pressed the armscye seams in toward the sleeve as per pattern instructions and was able to turn the sleeves into more width than height. If this pressing had not been done the sleeves would be standing straight up off the shoulders (not a good look for a grown woman…)!

The tucks at the waistline in front and back are a fun way to shape the dress. The back tucks are further held in by the belt

back

The skirt is not excessively full

pleats

And the lower vee cut band and double flounces add some sewing interest to the project

full

I have written a review of this pattern at PatternReview.com, giving a few more details slanted towards the construction of this dress.

As I was gathering the yards of fabric needed for the sleeves and flounces I realized I had a few tips I could pass along.

Make long basting stitches at 1/2″ and just under 5/8″ per the pattern instructions and pull the bobbin threads at one end of your segment to be gathered. Wind them in a figure 8 around the pin holding the piece to be gathered to the straight piece

100_1104

Couture Caveat: I am showing you gathers worked in linen but for tinier gathers in fabrics made of finer threads shorten the gathering stitches!

100_1099

This will allow you to pull the bobbin threads at the other end of the segment taunt enough to fit the two pieces together

On longer segments pin the two ends in place and place a pin in the middle of the piece to be gathered

100_1110

don’t gather where there are seams that need to be matched

100_1107

100_1115

Wind off both ends and at the pin in the center, gently lift up the two bobbin threads

100_1116

pull the threads taunt

100_1119

and after you have shortened the gathered segment, wind off the pulled threads on the center pin. Make the gathered segment a bit shorter than the straight segment. This will make spacing the gathers much easier and the wound off threads will “give” a little as you work the gathers into evenly spaced waves of beauty.
Give gentle tugs downward on the fabric as you work for equal spacing of the gathers along the threads.
The dynamic you want to maintain is the gathered fabric suspended on the basting threads, like sheets hung on the clothes line. Then pin in place as needed and hand baste before machine stitching.

The continued gentle downward tug of the fabric as you machine stitch will help keep the gathers from bunching under the machine foot.

100_1138_edited-1

Happy Sewing!

June 27, 2009

Use Darts to Create Sheath Dress Drama

Making a sheath or shift dress like the one Georgene is doing now see the previous post can become a staple wardrobe piece. A sheath dress is a timeless design and if you have a good pattern it is a waste to not use it again and again.

But we woman want some more variations and making the same dress over and over is hardly an option we use without any design changes, except for some knit tops where we use a different fabric like prints or plain fabrics.

So if you have a good sheath dress pattern (vintage or new one) you can change the bust dart placement and have a new dress with the same good fit.

Playing with darts is a trick to use the same  pattern again. 

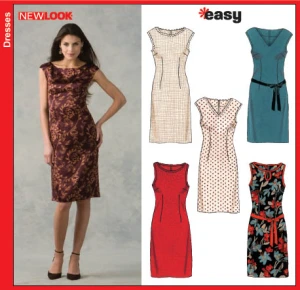
There are less sheath/shift dress patterns available these days but I found an example New Look 6643 which I used as an example to show you how to replace the bust dart into a new design feature.

New Look 6643 patternNew Look 6643

I do not have this pattern but I think it mimics my self drafted example with a side bust dart and waist darts.

I made a black sheath dress in a silk cotton fabric about 10 years ago but I have no picture of the finished dress to show you. See an example of the dress I made with a diagonal bust dart.

 I drafted a pattern to show you what to do if you have a sheath dress with a side bust dart and waist dart and want a new placement for the darts like this one,

new dart

My pattern draft example has no seam allowances added so if you want to change your pattern remove the seam allowances first, you can add them on later.

Step 1: Start with tracing your 1/2 front pattern on a double piece of paper since this new dress can not be cut on the fabric fold. 

Step 2 : make the pattern as a one piece and mark the center front line .

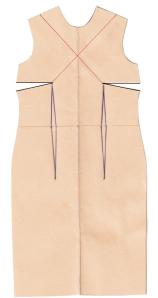
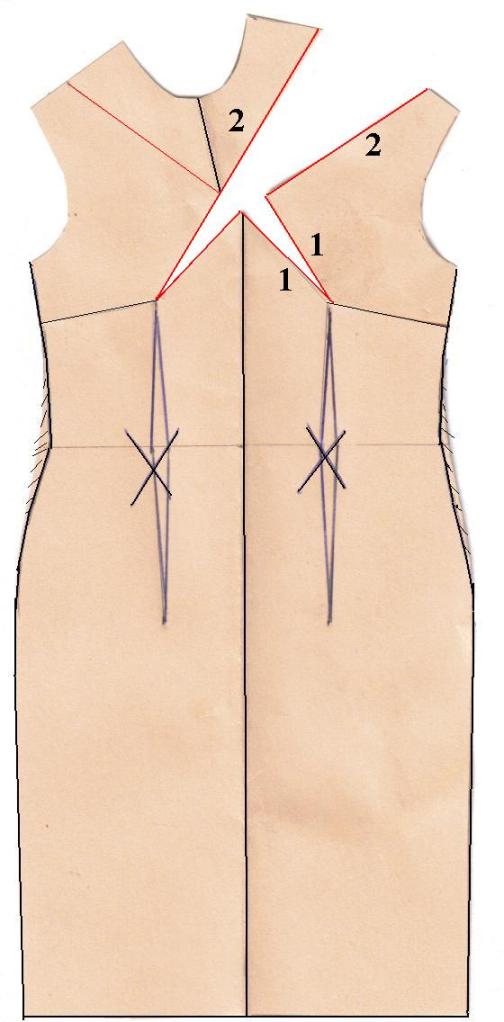
Step 3: draw a diagonal line from the shoulder towards the bust point, I measured 2 inches (5 cm) from the end of the shoulder, draw another diagonal line from the other shoulder crossing the line at center front.

Step 4 : Cut  the right side new diagonal line open towards the bust point and fold the original side bust darts closed. Voila a new bust dart placement.

 Step 1                        Step 2                         Step 3                                 Step 4 

sheath dress 1  sheath dress 2sheath dress 3 xsheath dress 4 x

 Step 5: Since the bust side darts are now closed you can true the side seams in a smooth line , the waist darts do not get used in this dress so you can remove the wide of the waist darts from the waistline of the side seams from the original bust dart towards the hip line.

You can peg the side seams for a more slimming look, but please remember that your dress needs enough wide for a sanitary stop ( use of bathroom)

To sew the new dart start with sewing the bust dart maked with 1 and then sew the diagonal shoulder seam marked as 2

The best way to mark the new bust dart in your fabric is thread tracing.

I would suggest to use a  a plain fabric for this new bust dart design.

If you want to use a print or plaid fabric just remember that the upper right bodice is not on grain.

sheath dress 5  x

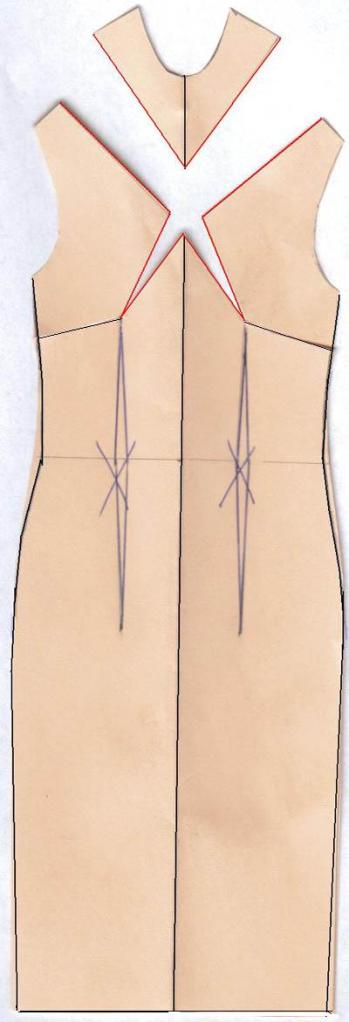
If you want to make this pattern in a print or stripe fabric I would suggest cutting off the upper bodice by cutting the left shoulder line towards the bust and voila another pattern design.

Using a stripe fabric and placing the upper part at the bias or cross grain ( crosswise) will give your dress another view. The possibilities are endless, you also can cut the center front line from the upper bodice and put both sides at the bias which will result in a chevron if you use a stripe fabric.


sheath dress 6  x

Enjoy sewing a new sheath /shift dress design.

You can of course use this new bust dart placement for any blouse or top too.

May 9, 2009

Flared hem skirt

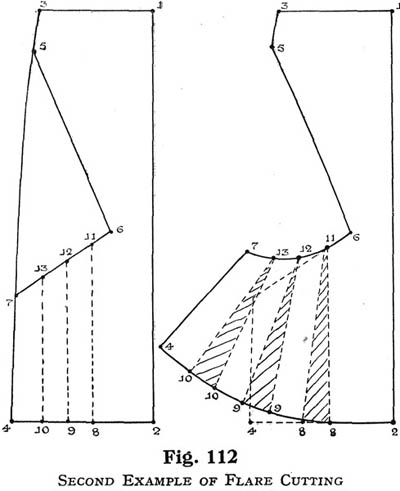
I made a new skirt for my mother ( 88 years ) from a wool polyester fabric to match a rtw jacket, and used a design sample draft I found years ago on ebay, I downloaded the picture probably from a pattern-drafting book but I forgot  the book title. If anyone knows from which book this picture is please tell.

 The design is made by changing a straight skirt into a flared one.

skirt design a

I already made this skirt last year  but that one had a center front seam because I had not enough fabric to cut it on fold.

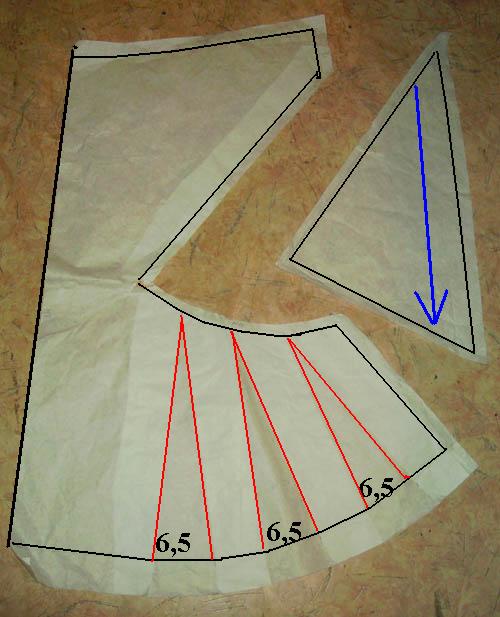
Slash and spread is all what is needed to make this skirt design. I added  6,5  cm between the slashes.

I started with a straight skirt pattern drafted on her measurements and draw lines on the front .

The skirt back pattern is just a straight skirt , only the front has flares towards the side seams.

 Skirt I made last year had a center front seam because I had not enough fabric to cut the center front on the fold.

Front                                                                                                                                    Back

front  back


This time I had enough fabric so no center seam.

slashed pattern

I made the pattern with added seam allowances , 1 cm for the inner corner and separate inset piece and 1.5 cm for the side seams; hem depth is 4 cm. Serging the seam allowances for the fabric, and for the lining I choose to finish the inner corner with a pinking shear with a less wide SA about ½ -3/4 cm.

 The inner corner of the front piece of the skirt fabric and lining are stabilized with a piece of fusible interfacing.

inset wrong side a


Sewing the insert piece, pressed the seams open first and together again so they will lay towards the CF and towards the hem.

side view

The skirt has an invisible zipperat the CB and a contoured front waistband and a straight waistband at the back side due to her posture.CF length 67 cm, Left side seam 71 cm, right side seam 69 cm, CB lenght 74 cm. The waistband is closed using a button and buttonhole.

I sewed the waistband first at the edge and graded the seams , sewed the skirt with a 1 cm seam allowance at the front side waistband and the back side waistband towards the lining with 1 cm sa.

The sa from the skirt and front waistband are pressed towards the waistband, while the sa from the lining and backside waistband are pressed towards the lining skirt.

This will result in a more smooth waistband seam and not a bulky one which has 4 layers of seam allowances inside the waistband.

The waistband was top stitched a hairline away from the skirt seam

contoured waistband a

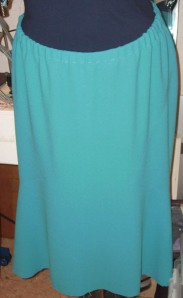
It is a bit of flurry picture but you get an idea how this skirt falls.

front side a

I inserted a piece of elastic inside the waistband, because my mother likes that.

I used  a 4 cm deep hem and hand stitched the hem about 1 cm from the edge so no imprints,


hem stitch 

 This skirt design is a nice one if you want to add some flare at the front hem but do not want to add more wide at the hip line. The back side is just a straight skirt.

P.S. 

You can add some flare to the side seam starting at a point somewhere below the hip line but the original side seam length should match the new flared side seam.

flared skirt
You can see on the example design sketch that the cut out triangle inset side seam is longer than the space between point 7 and 4 from the skirt  because of the added flares. Sewing the triangle inset makes this skirt design to flare out towards the front.

Next Page »

Blog at WordPress.com.