I was working on my bias shirt today, installing the zipper in the back. It’s a centered application, which I actually like, but it can have disastrous results if not done properly. So I thought, “Hmmm, maybe there’s a tutorial here that might help some folks. So here you go. This way works for me; hopefully it can help you too.
Step 1 – Sew the Seam
You have to start somewhere, and the seam is a logical place, right? Sew your seam up to the point at which your zipper starts, or ends, or both:

Baste the remainder of the seam closed, and press the seam allowances open.

Step 2 – Hand Baste the Zipper Into Place
This is probably the most critical part of the whole operation. In most commercial patterns, the instructions tell you to machine baste the zipper in place, then sew in place. The problem is that with most fabrics, machine basting will cause slippage, and then when you sew the zipper, you will get bubbles and puckers, the hallmarks of “Happy Hands at Home” syndrome.
Instead, try this. Place the zipper at your markings, open it completely. Then starting at the top of the zipper, hand baste in place using long running stitches:
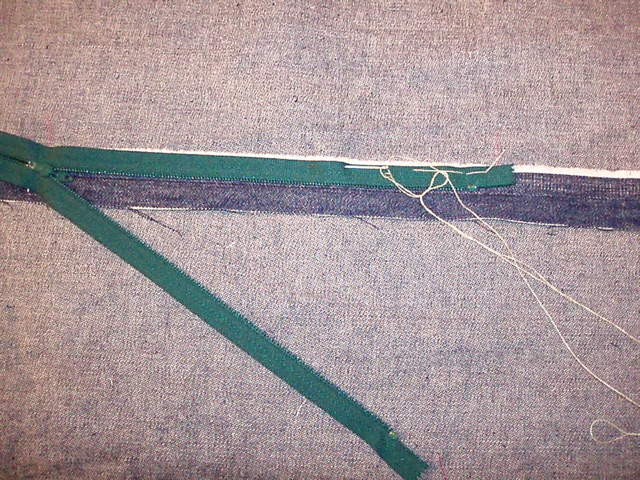
Notice something in the picture. The zipper teeth are set very slightly back from the basted seam, probably a scant 1/16th of an inch. This will keep you from getting “zipper gaposis”.

Next, close the zipper and baste the other side. Here again, you will want to pull the zipper toward the raw edge of the seam as you baste so that, when opened, the teeth are ever so slightly offset from the folded over seam allowance to keep the gaposis at bay.
Step 3 – Sew on the Outside
Once you have your zipper basted in place, sew down one side of it using your zipper foot on your sewing machine.

There is only one tricky part to this operation. To keep from getting a stitch “bubble” around the zipper pull, open the zipper before starting sewing. Once you get about half way down the zipper, drop the needle into the fabric, lift the presser foot, and carefully close the zipper (you’ll be working from the underside of the fabric). Once the zipper is closed, lower the presser foot and continue sewing. Pivot at the bottom of the zipper, and sew to, but not all the way across, the zipper, avoiding the metal zipper stop.

Repeat this step on the other side. Here’s the other important part: To avoid needless bubbles and distortion, start at the same place, but on the other side of the zipper, so you sew both sides in the same direction.

Step 4 – Finishing
Once you have the zipper sewn in place, remove all the basting and press carefully. Voila – a perfectly placed zipper with no bubbles!


 Subscribe with Bloglines
Excellent explanation of sewing in an invisible zipper.
I have read a few different ways of installing an invisible zipper but none as clear and as simple as that!
Thank you
Ben
Comment by Ben — February 6, 2007 @ 4:13 am
But that isn’t an invisible zipper, is it? It it was, you wouldn’t see any stitching on the right side of the fabric…
I am curious as to why you choose to use a regular zipper rather than an invisible one?
Comment by Henriette — February 6, 2007 @ 5:02 am
No, it’s a regular zipper. I used that, Henriette, because I had it in stash. Since it’s -15degF right now, I am using up stash to avoid going outside! 🙂
Comment by Gorgeous Things — February 6, 2007 @ 7:03 am
Excellent explanation. With blogs like yours, the sewing world is a better place.
Comment by Mary Wilkins — February 6, 2007 @ 8:06 am
Ann, thanks for a great lesson on zippers. I am going to be using this method for sure … bias or not. I have started basting by hand more often, but that slight offset I had not thought of. And it is such an obvious solution to that gaposis problem, too.
Comment by Lorna — February 6, 2007 @ 9:26 am
Thanks for the tutorial! I’ve always sewed the zipper in one motion which explains my bubbles.
Comment by Sid — February 6, 2007 @ 2:54 pm
That was good, and immediately pointed to several things I had been doing wrong. But just a quick confirmation — does that mean you don’t sew across the bottom of the zipper at all? Ever? That’s what it looks like in the final picture, and I wondered about seam strength.
Comment by bibliotecaria — February 6, 2007 @ 3:21 pm
Bibliotearia, you sew up to the sipper, and you can backtack on either side. That’s what I do. You can also sew just past the center of the zipper on both sides, so you overlap the stitching at the bottom for 2 or 3 stitches. I haven’t had any issues with the strength of the seam, but that part of the seam doesn’t take a lot of stress to begin with, in this kind of zipper.
Comment by Gorgeous Things — February 6, 2007 @ 4:54 pm
This is an easy and effective way to sew a zipper. Thanks a lot! I admire your blog and the knowledge you share…
Regards,
Katrin
Comment by Katrin7 — February 7, 2007 @ 5:52 am
Thanks for clearing that up….I think I should look in my stash of zippers and use your great tutorial to sew a regular zipper in my next project…thanks!
Comment by Henriette — February 7, 2007 @ 6:28 am
Thank you very much for a clear explanation of how this is done.
For newbies to sewing like me, tutorials like these are very valuable!
Comment by Janimé — February 7, 2007 @ 4:16 pm
Great tutorial! Thanks for info, it is great for us newbies. Any chance you have an invisible zipper in your stash? Would love to see your steps on how to install. You present the process so clearly and easy to follow. I tried once using special foot and it was a diaster!
Thanks, Jeannie W.
Comment by Jeannie W. — February 8, 2007 @ 1:11 pm
Do you have a tute for installing those metal snap closures that are used in purses. Although they came with a tool the package did not include any instructions, and I can’t seem to figure it out.
Comment by jen — February 10, 2007 @ 9:26 am
Awesome!!!!! How helpful, Ann! This is the seonc time you’ve helped me with zippers. The first was stating in the PR Forums that an invisible zipper is the easiest to insert. After that, I started sewing pants with ‘blind ritz’ fearlessly! Merci!
Comment by Katharine — February 11, 2007 @ 5:50 am
Brilliant!
Could you avoid the “gap” further if you deliberately used a too-long zipper, and left the excess with the pull at the top?
Then you’d open the zipper after you open the center top, cut off the excess AND Zigzag the cut ends so you don’t lose the pull. (A Nancy Zieman technique, I think.)
Comment by Melissa — February 12, 2007 @ 2:16 pm
I appreciate the information conveyed on this tutorial; however, I’d like to know how to get to other wonderful tutorials provided by The Divas without going through each page of tutorials that are offered?
Comment by Wanda — February 12, 2007 @ 8:30 pm
Great idea about basting the seam allowance shut !! It worked out perfectly for me! THANKS!!!
Comment by iheartcouture — February 12, 2007 @ 11:58 pm
Oh my gosh this is such a light bulb moment! Move the lift the presser foot and move the zipper stop. Wowee. You’ve made my day!
Comment by Kelly — February 13, 2007 @ 5:16 pm
A time-saver that works for me is to use the 1/8″ double-sided sticky tape from the quilting department before hand-basting instead of pinning (It washes out and doesn’t gum up a machine needle.)
I press a strip of tape onto one right side of the zipper tape, peel off the backing strip and carefully line up the zipper with the seam. The tape lets me reposition the zipper until I get it just right, then I put another strip on the other side of the zipper, close the zipper, and press it down. Then I hand-baste and sew.
Comment by LouisaP — February 14, 2007 @ 10:33 am
I’ve always basted the seam first. Sometimes do, and sometimes do NOT hand baste the zip. However, I’m not understanding HOW you move the zip tab up and down once you’ve sewn the first side? i.e., you can’t get to it once one side is sewn. I’m referring to avoiding the bubbles here which has always been my problem. I like the NZ method, but NOT cutting the zip off — too nervous about it coming off down the road.
Comment by jane — February 16, 2007 @ 1:12 pm
THIS IS VERY AN EASY EXPLANATION THANK YOU
Comment by MARVA GODBOLT — February 19, 2007 @ 4:06 pm
What an excellent tutorial! Thank you! It was compltely easy to follow and sensible, logical, clear. You are a natural born teacher.
Comment by victoria — February 20, 2007 @ 9:58 am
Jane,
When using a longer zipper,I don’t think you cut off the zipper top. I believe you cut the extra length off the bottom AFTER you have sewn across the end several times. You then cut the excess off below where the zipper was to end
Example. if a skirt calls for a 7″ zipper, you have on hand a 12″, Insert the zipper. Then measure down from the waist the 7 inches, sew across the bottom of the zipper, ( while closed) as if making a bar tack. Then cut the extra lenght of 5″ off.
Someone correct me if I am wrong.
Kaydee
Comment by Kaydee — March 19, 2007 @ 3:34 am
thank you! very helpful!
Comment by Kort — September 18, 2007 @ 10:33 pm
I also like to baste my zipper in by hand to position it. I then like to stitch the entire zipper in by hand. For the lower side I use a back stitch, and for the top, a pick stitch. This enables me to contour the zipper for curves (upper level needs more room over lower). I then add another line of back stitching on the back of the upper side. Be sure to wax to your thread to prevent knots. I just like the look and feel that I have better control.
On another note, I’ve been finding zippers at thrift shops (25 – 50 cents) and cutting them off to lenth after inserting (back tack at end). Finding bargins at thrift shows is just one of my sports!
Comment by Dianna — September 20, 2007 @ 9:28 pm
If you use a longer zipper than necessary, you can leave the pull hanging off at the top and not have to sew around it. Then once you are finished sewing the zipper and opening the basting, you unzip it, cut off the excess zipper tape, and install an appropriate size zipper stop on each side so you won’t lose the pull. I’ve never seen these stops for sale in the local fabric store, but several years ago I ordered a bunch of them from owfinc.com. They cost only five or ten cents each, so twenty bucks bought enough for years worth of projects.
Comment by elizilla — November 28, 2007 @ 11:57 pm
When I tried it, why does it still bubble up?
Comment by Steph — April 20, 2008 @ 1:47 am
Very nice explanation and pictures, it seems so easy when I do it, but put it in words is harder!
Thank you very much.
Comment by ModaVersatil — April 24, 2008 @ 8:26 pm
I know thi sis an old post but… thank you! I have been zipper-challenged for a long time!
Comment by Margaret — May 28, 2008 @ 2:44 pm
I have avoided zipper patterns but now I feel confident I an try this. I searched many sites for a “how to” and this is the best. You are a good teacher.
Comment by Miriam — July 24, 2008 @ 8:29 pm
OK, now I am feeling like maybe I can take on that dress pattern my daughter talked me into. THANK YOU. I’ve been zipper phobic…I am eager to try this method and see if it works for me!
Comment by Amy — September 11, 2008 @ 12:53 pm
I’m not sure if you are my sewing Goddess or savior! Thank you so much, you saved my skirt!
Comment by Margie — July 7, 2009 @ 11:17 am
ahhhhhhhhhhhhhhhhhhhhhhhhmmmmmmmmmmmmmmmmmmm
thnx for sharing next time again
love
Comment by jayve may — December 8, 2009 @ 5:04 am