Using the rolled hem foot is easy as pie – with just a little practice. You can’t beat this foot for a quick, neat hem on lightweight fabrics!
Step 1: Using the size of your foot as a guide, turn and finger-press a double hem at the edge (or your starting point if you’re hemming in the round)

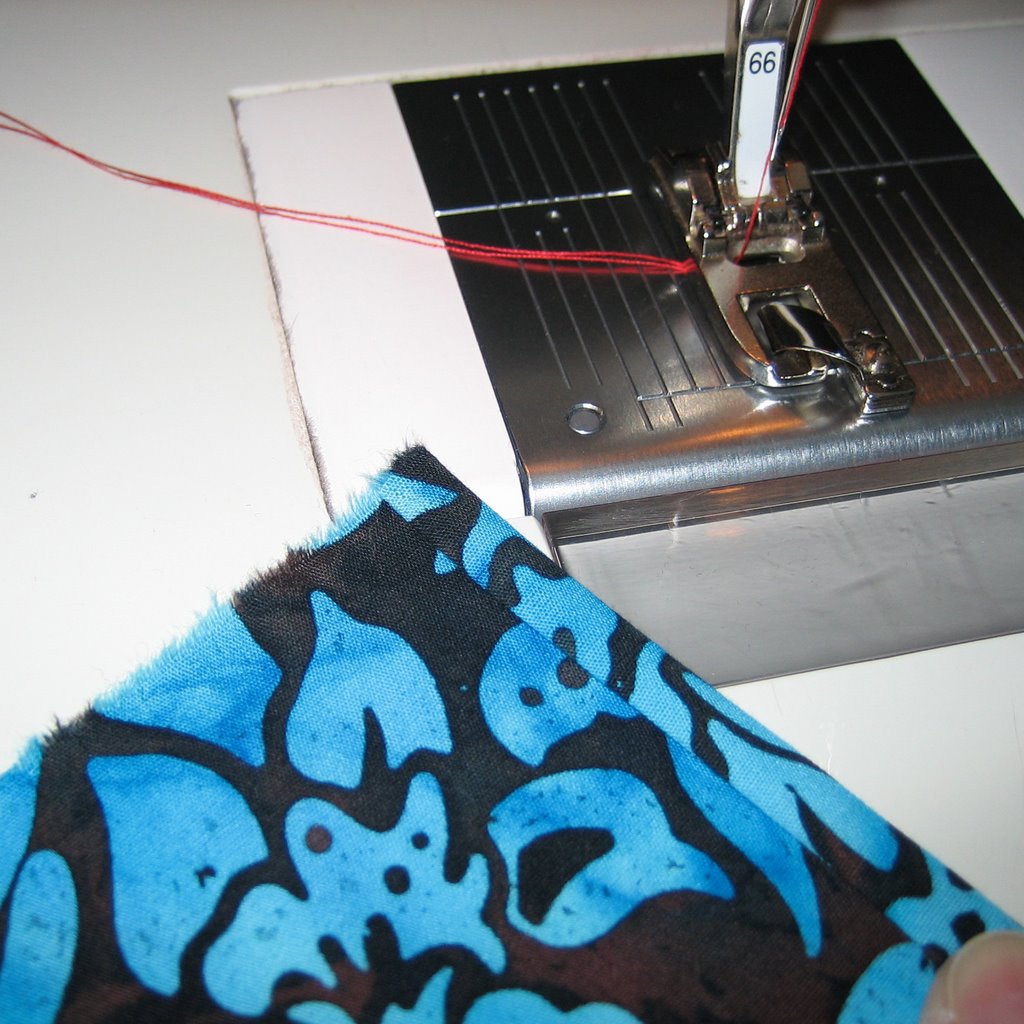
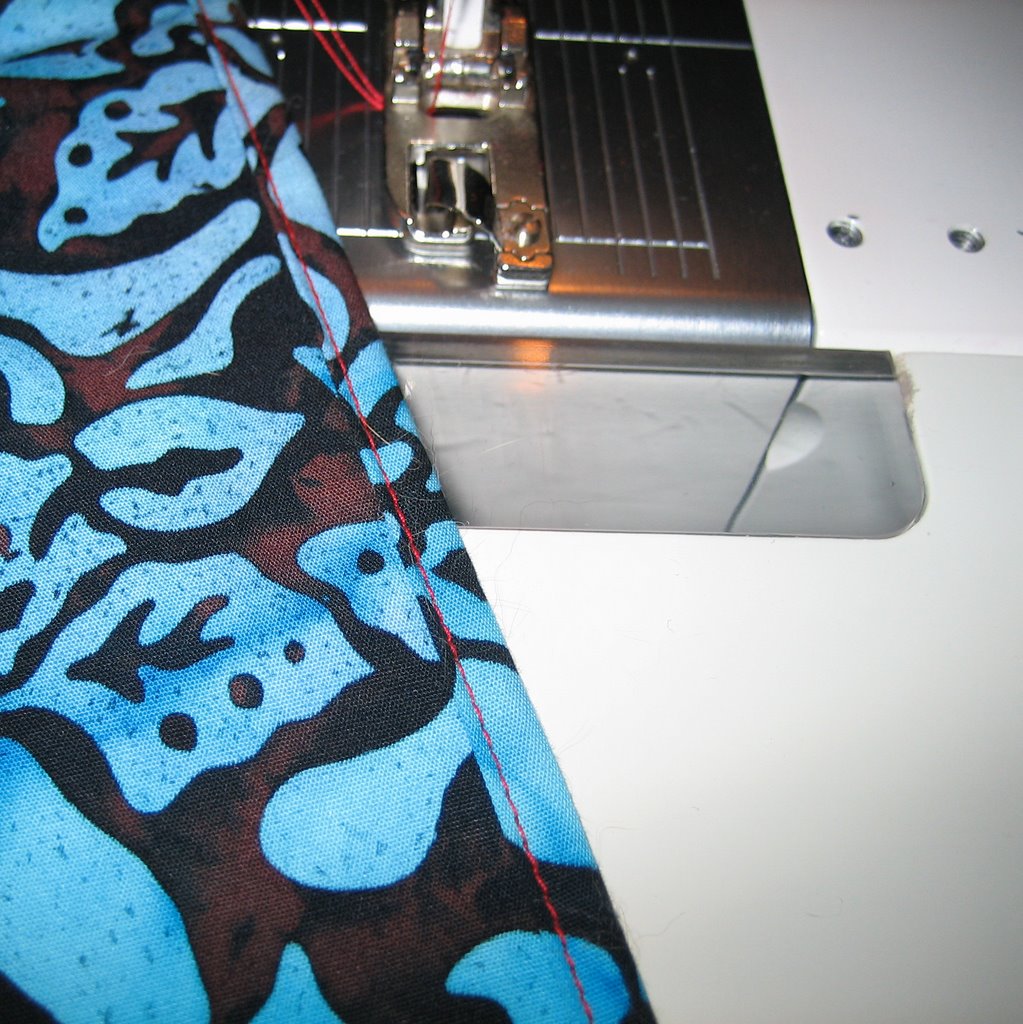
Step 2: Without putting the hem into the scroll of the foot, sew your hem for about a half-inch, just enough to anchor it. Stop with the needle down.
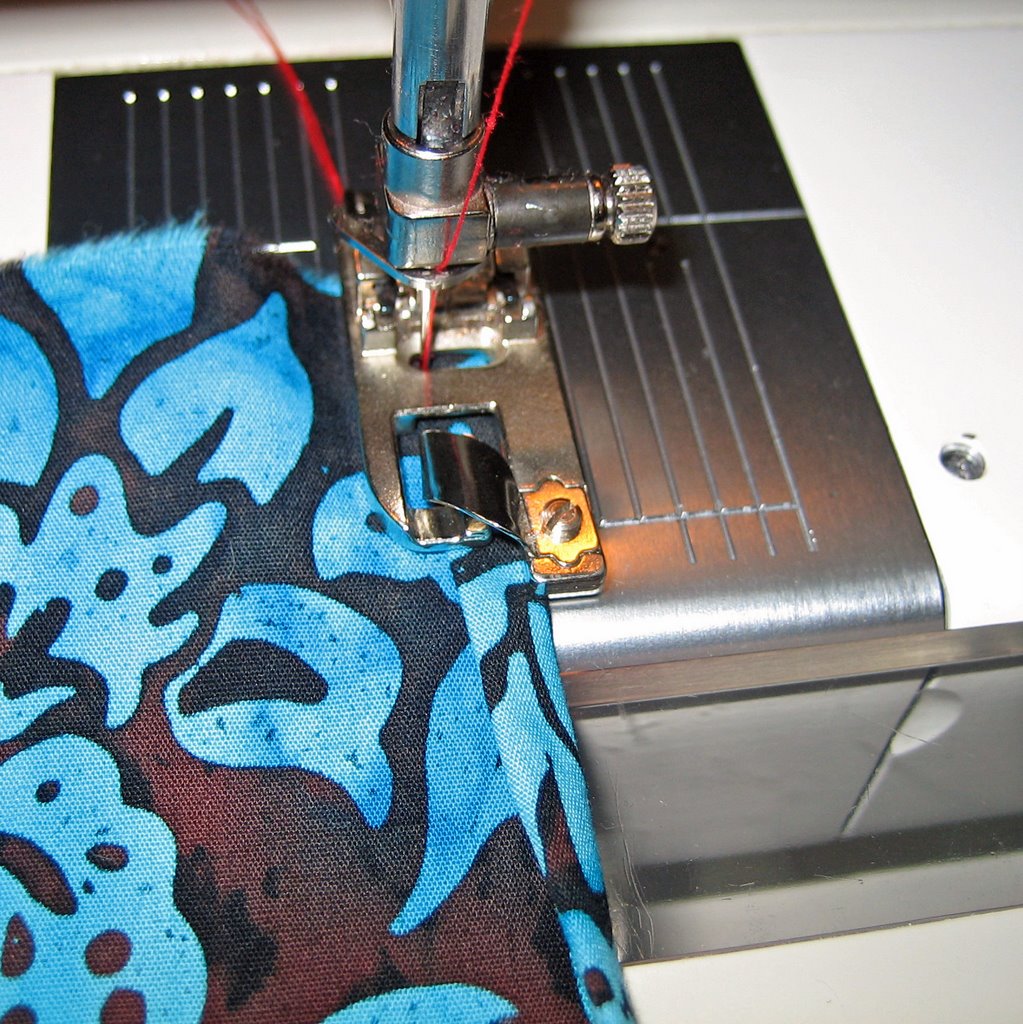
Step 3: Using an awl or your seam ripper, guide the fabric into the scroll.
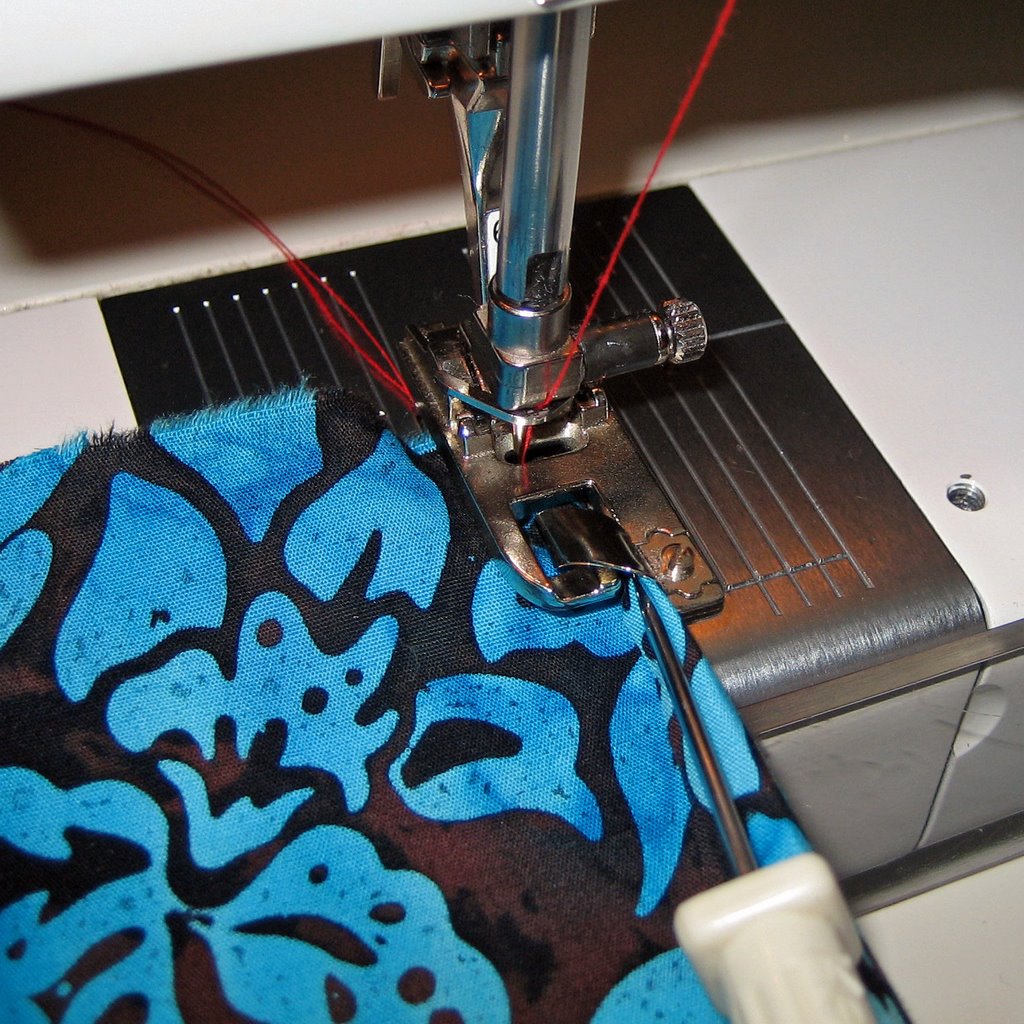
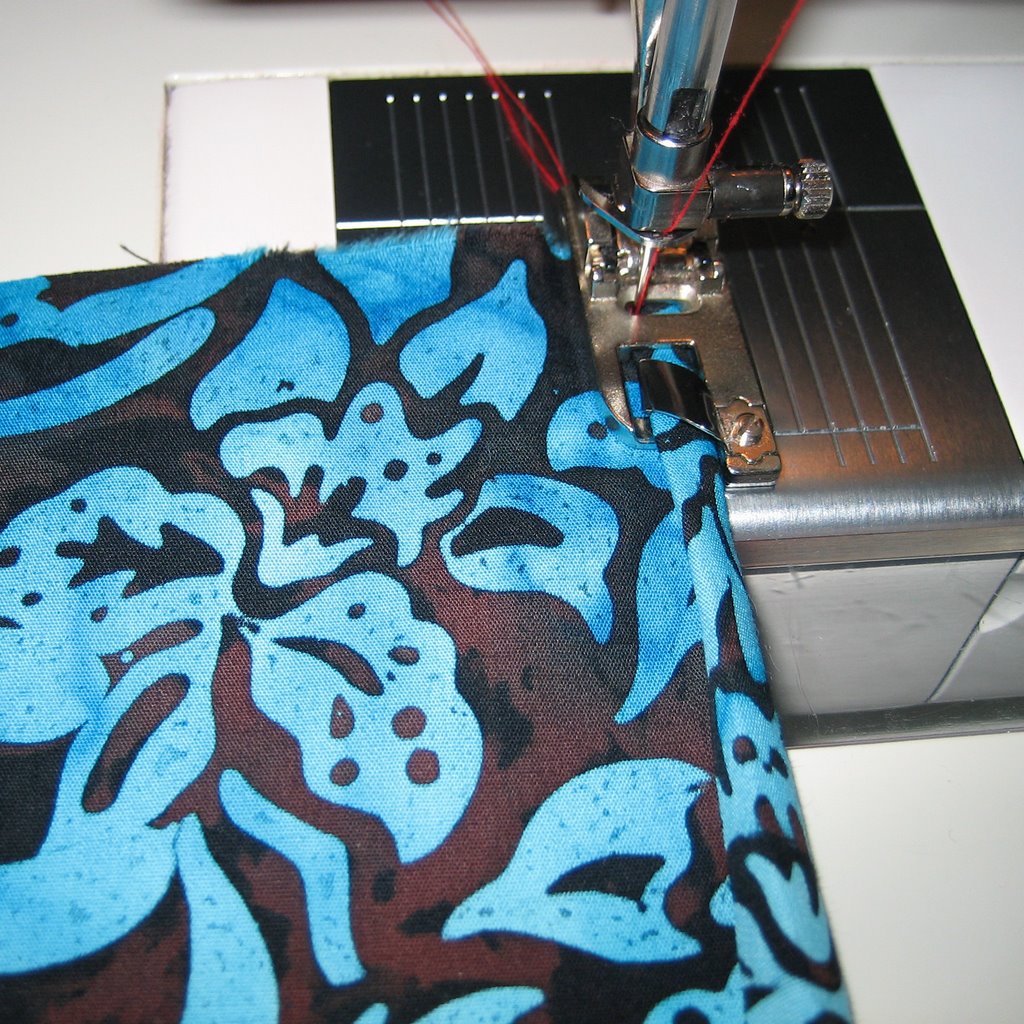
Step 4: While keeping your edge straight and feeding the fabric evenly into the scroll, complete your hem.
If you are making napkins or a similar project where you’ll have to hem over a previously hemmed area, do the same as before. Simply finger press the starting point and stitch well past the bulky area before feeding the fabric into the scroll. Before you reach the other hemmed end (I hem north and south, then east and west) stop, remove the fabric from the scroll, finger press and resume stitching.

TIPS:
*If you are working in the round, stop a couple of inches before you reach your starting point, remove the fabric from the scroll, finger press your hem and finish your stitching.
*When approaching bulky seams, it will often be necessary to remove the fabric from the scroll, stitch past the bulk and then reinsert the fabric. Leaving the needle in the fabric while you do this will keep everything in place.
*If I’m making napkins, I hem all the way across the width of my fabric (top and bottom) before cutting it apart into individual napkins. This is faster since it eliminates a lot of starting and stopping. For instance, if I’m making 18″ napkins I cut my fabric into 19″ pieces across the width before hemming the long edges. Afterward, I cut the strips into 19″ pieces and hem the short ends.

 Subscribe with Bloglines
*smacking forehead* Duh!
What a great idea to hem the whole width before cutting individual napkins…and so obvious…and I never thought of it… 😉
I can see I need a different rolled edge foot; the one that came with my machine makes a baby fine rolled edge about half the width of the one you show. It severly limits the fabrics I can use it on…and I had no idea they came in different widths. Duh again.
You have enlightened me greatly…a good thing for a Monday morning! Thanks, Gigi!
Comment by Lisa Laree — October 16, 2006 @ 7:08 am
Gigi, this is the first time I have actually had hope of being able to use my rolled hem foot. Thank you! I’ll let you know if I am successful.
Comment by Gorgeous Things — October 16, 2006 @ 7:16 am
Thank you soooooo much for this tutorial Gigi! I have *never* been able to use my rolled hem foot because I could not figure out how to start the darn seam. Now I can’t wait to try it.
Comment by sew it seams — October 16, 2006 @ 7:57 am
Great tutorial, Gigi. Blessings! I always have trouble at the beginning, and had abandoned all hope. I may not use this for silk chiffon, but definitely makes sense for other applications.
Comment by Georgene — October 16, 2006 @ 8:26 am
Excellent instructions!
Comment by Anonymous — October 16, 2006 @ 8:42 am
Thanks for a great tutorial! It’s been bookmarked!
Comment by Erica B. — October 16, 2006 @ 9:57 am
Gawd, I didn’t even know that was the rolled hem foot! 🙂 Thanks for a great tutorial.
Comment by Kelly — October 16, 2006 @ 10:30 am
This is one of those skills, like parallel parking, that I always need to re-master. Thanks for the winderful tutorial Gigi!
Comment by Phyllis — October 16, 2006 @ 12:11 pm
Thanks, Gigi! I have a rolled hem foot and desperately wanted to use it, but couldn’t figure out how. This will help immensely.
Kris
Comment by Anonymous — October 16, 2006 @ 1:33 pm
Gigi, this is the best description ever and the pictures are very helpful. This is what has prevented me from making all the button down shirts I wanted to make. You give me hope.
Comment by Mary T — October 16, 2006 @ 2:07 pm
Gigi, thank you! I always get stuck on beginning my rolled hem. It ends up looking horrible and I end up ditching it. I think I’ll be able to master this now. Any suggestions for doing a rolled hem on curves? Or does that just take practice?
Jodi
Comment by Anonymous — October 16, 2006 @ 2:21 pm
Great! I’ll have to dig mine out – I don’t use it often enough.
Comment by Summerset — October 16, 2006 @ 2:41 pm
Great tutorial, I was so excited to use my rolled hem feet I recently purchased, only to experience failure and frustration. I am going to give this a try.Thanks!
Comment by maiaj — October 17, 2006 @ 6:48 am
Gigi,
God bless you, girl! Thank you for this very well documented and photographed tutorial. Just like being there…
Terry in Chicago
Comment by Anonymous — October 17, 2006 @ 2:22 pm
I sure could have used this foot this week as I stitched up 20 neck scarves for my kids’ Scout troops!
I am going to have to get some me a couple of these … which sizes do you recommend? I was thinking of a 1/4″ and maybe a finer one if there is one?
Comment by Lorna — October 17, 2006 @ 4:53 pm
Thank you for a wonderful tutorial Gigi! And what a perfect timing. I just purchased the rolled hem foot.
Comment by Maja — October 18, 2006 @ 1:07 am
Gigi –
I have been using my rolled hem foot the same way you describe over bulky hems. Except I thought I was cheating by removing the fabric from the scroll. You made my day! I’m not cheating, I am actually doing it the best way possible. Thank you!
Linda
Comment by Linda — October 19, 2006 @ 5:16 am
Thanks for the great instructions – I pull mine out once every couple of years, play with it for a half hour, and then give up… I’m thinking some new napkins might be the perfect practice project….
Comment by Anonymous — October 19, 2006 @ 2:35 pm
I’ve been using a rolled hem foot based on David Coffin’s recommendations in “Shirtmaking.” However, on the first two shirts I’ve made, the rolled hem came out wavy, as if it had been stretched. Also, after wearing the shirts, the hem flips out and up, bunching and revealing the underside of the fabric. Any suggestions? I’ve tried pressing the seams flat, but they just get wavy and rumpled again. Everything else on the shirts has come out beautifully but this!
Comment by emily — December 19, 2006 @ 11:01 pm
I have the Viking 10mm hemming foot which looks different than yours. It is not a foot but a piece that attaches to the plate. I can’t get it to work and I’ve tried a lot. Any ideas on that?
Comment by Dawn — January 12, 2007 @ 12:35 am
*BIG smacking kisses* WOW! Thank you so much for this priceless tutorial! I feel like an expert now!
Comment by Jan — March 5, 2007 @ 9:08 am
I’ve never blogged before, but I have the same question as #19, so I’ve copied and pasted it below, and hope you can help me. I was impressed by your clear explanation of the rolled hem. My daughter-in-law just gave me a bridesmaid dress to hem one week before her cousin’s wedding! I bought a rolled hem foot, which I seem to have figured out, except for the wavy part described below (especially on the polyester lining):
I’ve been using a rolled hem foot based on David Coffin’s recommendations in “Shirtmaking.” However, on the first two shirts I’ve made, the rolled hem came out wavy, as if it had been stretched. Also, after wearing the shirts, the hem flips out and up, bunching and revealing the underside of the fabric. Any suggestions? I’ve tried pressing the seams flat, but they just get wavy and rumpled again. Everything else on the shirts has come out beautifully but this!
Comment by emily — December 19, 2006 @ 11:01 pm
Comment by Nancy — April 17, 2009 @ 8:01 am
How do you do a corner?
Comment by Marti Nicholas — April 27, 2009 @ 9:39 pm
[…] couldn’t have gotten this far without this awesome tutorial from the Sewing Divas. I think once I get the hang of it, this little foot is going to be a big […]
Pingback by that’s how i roll : julie kundhi — June 4, 2009 @ 9:30 am
Great idea for sewing the napkins helped alot!
Comment by sheena — June 13, 2009 @ 5:51 am
Has anyone had good results doing a rolled hem on chiffon?
Comment by Betty — June 16, 2009 @ 10:00 am
Thanks a million, I forgot how to use mine!
Comment by boervrou — August 26, 2009 @ 2:43 am
Yes I just made my grandaughter an ” Alice in wonderland dress”,,the “chiffon with ribbon bodice” and I used my rolled hem foot to good effect You have to just hold the fabric steady and “guide” it into the roller and not look at the needle=also you have to experiment with the needle position so it will catch the rolled hem in place.Holding your fabric “up” about an inch helps to guide it in,,and go slow.
Comment by Janice Giaco — May 1, 2010 @ 6:23 pm
Thank you so much! I can finally use that darn foot!
Comment by Cisa — May 7, 2010 @ 7:31 pm
I looked at this foot and tried to work it out and was completely baffled until I read your instructions. It’s all so easy when you have someone to show you how. Thanks – I have made 6 table napkins and they look great.
Comment by vieuxchat — August 18, 2010 @ 11:51 am
[…] are such a huge time-saver, get them out and practice! If you need a refresher, check out the tutorial I posted at the Sewing Divas a few years ago. It really is easy as can […]
Pingback by Burda Style 08/2010 #120 – Final « Gigi Sews — August 28, 2010 @ 9:34 pm
Thanks so much !!!! I finally learned how to use this foot and my project came out great and no more burned fingers trying to press a small hem !
Comment by Dione — September 4, 2010 @ 3:39 pm
[…] step; Google it! I found this site The Sewing Divas and they gave a great little tutorial on how to use this foot. It seemed pretty simple, and it only […]
Pingback by You can teach a late twenties Mom new tricks! « Not a Coupon Queen — September 8, 2010 @ 9:10 am
Incredible tutorial, Thanks for sharing it without a cost. As I am a 59 yr. youngster out of work,for the past year and a half. My husband of 62 just found a decent job and went to work this week. Had to close our 40 year business in 08. It really warms my heart to know that people still can share for the good of others. So bless you for creating such a wonderful site. Things always do work out! Thanks again, this site will be a second home home to me now. Sherri in Foristell.
Comment by Sherri McKinnon — September 25, 2010 @ 9:38 am