
In my picks to click for fall, one of the standout patterns was Butterick 4859, a skirt with a cool contrast front panel that flares gracefully out in the back. I was really excited by the design possibilities this pattern presents. You can get as creative as you like, with variations on fabric, color and print contrasts. I wanted to try something different though, and I decided to make the skirt from all the same fabric, using slotted seams with a contrast backing as an embellishment. This adds a nice, couture touch, but it’s really not that hard. Let me show you what I did, and maybe it will give you some ideas for creative use of seaming in your own garments.
Step 1, Make Your Contrast Backing
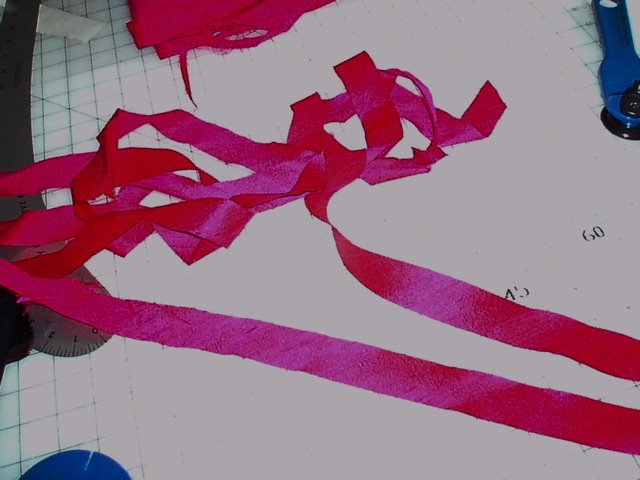
Make continuous bias strips measuring the length of all the seams you want to back, plus a little. The strips should be 1 1/4 inches wide. This is the width of two standard (5/8″) seam allowances. If you’re not familiar with how to create bias strips, there are lots of good sewing reference books that have clear instructions, especially home-dec books. I also think Sewing for Dummies has good instructions.
Step 2, Prepare the Seams
Decide which seams of your outer garment are going to be candidates for the slot/contrast. In this case, I decided to back the seams between the lower, middle and upper front pattern pieces, and the seams for the pieces that formed the flared gores. I didn’t apply this to the center back or side seams. Baste the seams to be backed together and press open, just as if you had sewn them normally. If you need to clip seams, do so carefully, since you don’t want to cut too far into the seam allowance.
Step 3, Attach the Contrast

Center the contrast strips over the basted, pressed seams, making sure you press and steam to stretch and shrink the trim to fit any curves. Baste the contrast strips to the outer garment. I keep the basting line close to the edge of the contrast fabric.
 I want to add here that I did all my basting on this garment by machine. The skirt is a wool crepe. If I were making this skirt out of a silk or any other delicate fabric, I would baste by hand.
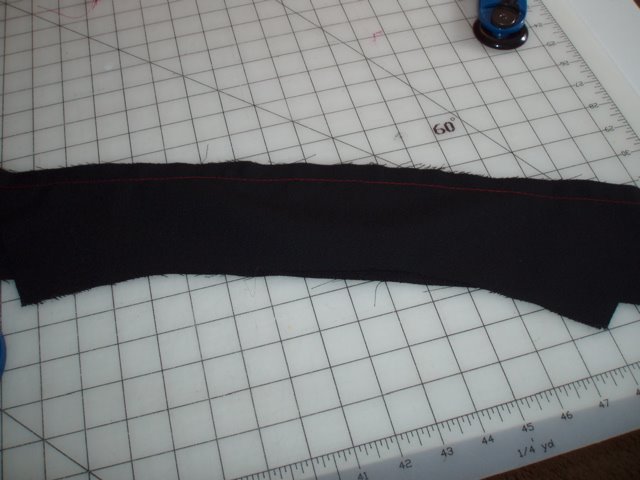
Once the basting is done, flip the fabric over so the right side is facing up, and topstitch 1/4 inch on either side of the basted seams. Use a 3mm stitch. In the case of this skirt, I used matching (black) thread. You can add a nice touch by using a thread color that matches your trim. This picture shows the final stitching on the wrong side of the garment piece:

You’re almost there!
Once your slotted seams are in place, stitch the garment together just as you normally would. When it is assembled, but before you attach any linings, facings or hem the garment, remove the basting in the slotted seams. Volia!

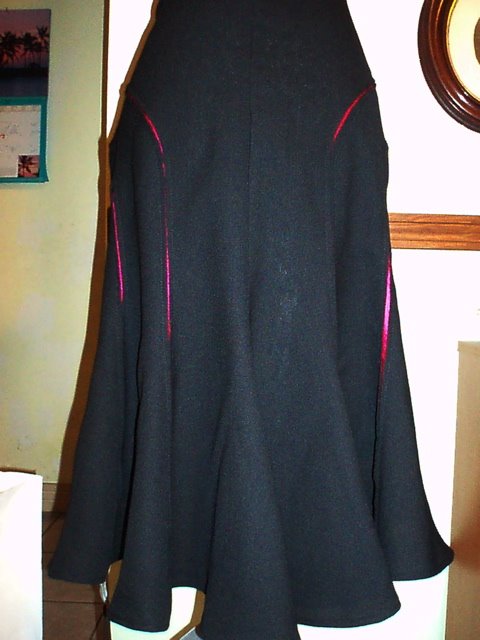
Here’s a picture of the finished skirt:

I’m having problems controlling the exposure on my camera, so I’ll take another picture tomorrow outside and post it instead of this one, but this gives you an idea. Here’s the back:
As I say, this takes very little effort to accomplish, but it makes a big difference. Try it on a princess seamed jacket, on the side seams of a pair of pants or on the seams of a skirt like this. Make a test seam on a remnant of fabric and you’ll see just how easy it is to add a lovely designer touch to your work.
Happy sewing!

 Subscribe with Bloglines
That is so fabulous Ann! Can’t wait to see it in person with some cool boots and a great jacket.
Comment by Phyllis — August 24, 2006 @ 7:27 pm
So cool! I’m thinking tartan strips on the bias… one of the few ways for a grown-up curvey woman to carry off a plaid skirt.
Lady MacBeth
(not really. But it’s a great tartan for a cranky old broad)
Comment by Anonymous — August 24, 2006 @ 7:38 pm
What a fabulous idea! The skirt is soooo elegant – the slotted seams make it look very expensive. But, you’re worth it!
Comment by Gigi — August 24, 2006 @ 8:09 pm
Thanks for the tip, great skirt!
Comment by jemgirlca — August 24, 2006 @ 8:21 pm
What a gorgeous skirt, I fell in love with that pattern too … now I must make it, too!
Comment by Anonymous — August 24, 2006 @ 10:40 pm
That’s such a great skirt, Ann! This pattern does offer some interesting possibilities.
May I offer a suggestion about the blog? I love to read what you all have to say, but since I want to know who’s “talking”, I always scroll down to the end of the post to see who signed it before reading it. Would it be possible to add the name of the poster in the title of the posts?
Comment by Åsa — August 25, 2006 @ 12:04 am
What a geat idea! I have to try this really soon!
Comment by Maria — August 25, 2006 @ 1:17 am
Ann, I thought of doing this too, when I saw the pattern. When you mentioned on your blog it was going to be quite something, I was wondering if is this is what you’d do and what colors you’d use.
Beautifully done!
Comment by Summerset — August 25, 2006 @ 3:28 am
that is soooo gorgeous… Need to incorporate that at the next possibility….
Comment by Tini — August 25, 2006 @ 1:14 pm
Åsa’s idea is great. Would be nice to see who the poster is right off the top.
Comment by Anonymous — August 25, 2006 @ 3:02 pm
One word:
GORGEOUS!!!
Sorry, but I had to scream it.
Comment by Deborah J — August 26, 2006 @ 6:38 am
This is the best tutorial I have read on slotted seams! Thank you for taking the time to do this. I am going to use this idea. Your skirt looks great!
Comment by Linda — August 26, 2006 @ 7:22 am
LOVELY SKIRT . A REALLY SUBTLE WAY OF EMPHASIZING THE VERTICLE LINES AND THEREFORE SLIMMING. dID YOU SURGE THE SEAM EDGES OR LEAVE THEM GIVEN HE BIAS CUT TRIM AND THE LINING?
Comment by Anonymous — August 27, 2006 @ 5:28 pm
Fabulous! I’ve been inspired to try this!
Comment by Teri — September 1, 2006 @ 9:07 am
Cool. I’ve never heard of a slotted seam before. And it is straight-forward. Since your bias strip is twice the width of the seam allowance, you catch the edges when you stitch that on, so it finishes the seam at the same time as adding visual interest. Thanks for sharing this. I need to get over here more often! 🙂
Comment by AnneM / rockvillage — September 6, 2006 @ 5:55 pm